Honeywell 6110 Handleiding


Lees hieronder de 📖 handleiding in het Nederlandse voor Honeywell 6110 (4 pagina's) in de categorie Kluis. Deze handleiding was nuttig voor 37 personen en werd door 2 gebruikers gemiddeld met 4.5 sterren beoordeeld

Pagina 1/4
Models 6108G & 6110G
DIGITAL STEEL SECURITY BOX
Read this manual carefully and never store it inside the box!
Models 6108G & 6110G
Digital Steel Security Box
PACKAGE CONTENTS
1 Digital Steel Security Box
1 Operation Manual
2 Emergency Override Keys
4 “AA” Batteries
D
D
D
DD O
O
O
OO
N
N
N
NNO
O
O
OO T
T
T
TT
R
R
R
RR E
E
E
EET
T
T
TTU
U
U
UUR
R
R
RR N
N
N
NN
S
S
S
SS A
A
A
AA F
F
F
FFE
E
E
EE
T
T
T
TTO
O
O
OO
S
S
S
SS T
T
T
TTO
O
O
OO R
R
R
RR E
E
E
EE!
!
!
!!
For missing parts or difficulty operating your safe,
please contact our Consumer Assistance Department
by telephone.
Store will not accept returned products without prior
authorization. You must first contact our consumer
assistance department.
US/Canada 1-877-354-5457 (Toll Free)
Australia 0011-800-5325-7000 (Toll Free)
Germany 00-800-5325-7000 (Toll Free)
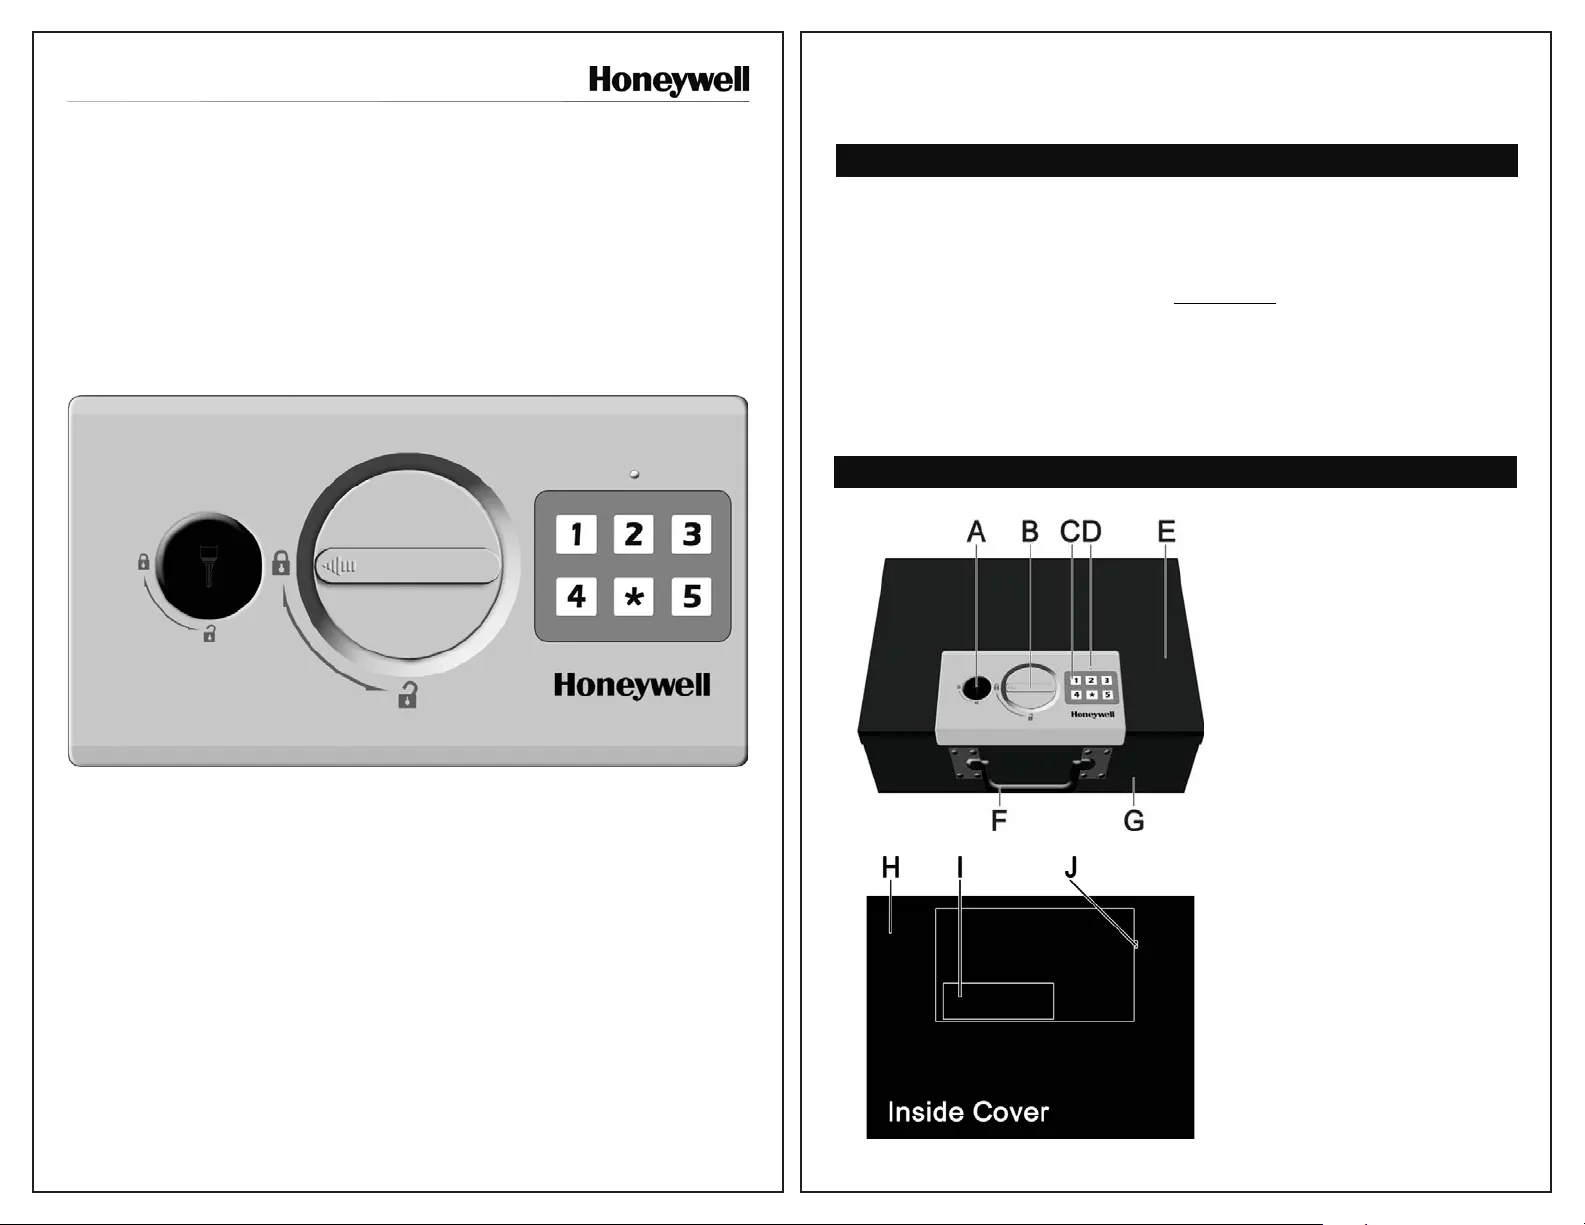
PRODUCT OVERVIEW
A - Emergency Key Cover
B - Open/Close Knob
C - Keypad
D - LED Indicator
E - Box Lid
F - Carry Handle
G - Box Body
H - Box Lid
I - Battery Compartment
J - Reset Button
SETUP & OPERATION
STEP 1: OPEN SECURITY BOX & INSTALL BATTERIES
For your convenience, we have included 4 “AA” Batteries that provide the power
for the electronic keypad. These must be installed before using your box. If
your safe is locked, you may use the Emergency Key to open it.
1. Remove the Black Emergency Key Cover.
1.
2. Insert the Emergency key and turn ¼ turn to
the left (counterclockwise).
2.
3. Turn the Open/Close knob ¼ turn to the left
(counterclockwise) and open the lid.
3.
4. Remove the Battery Compartment cover by
pushing in and sliding down.
4.
5. Install the batteries as pictured on the inside
of the Battery compartment.
5.
6. Once the batteries are properly installed,
replace the battery compartment cover.
Close Lid, Return Knob & Key to “Locked”
position and replace Emergency key cover.
6.
NOTE: If batteries are removed or fail, the keypad memory will NOT be erased
and the active programmed code will still work once power has been restored.
SETUP & OPERATION
STEP 2: OPEN THE BOX AND RESET PASSCODE
The preset factory user code is 3 .
1. Enter the factory preset code and you will
see the LED light turn green.
1.
2. Turn the Open/Close knob ¼ turn to the left
(counterclockwise) and open the lid.
2.
3. To program a new code, press the red reset
button on the right side of the battery box.
The LED light will flash Orange.
3.
4. Enter a new code (up to 5 digits), followed by the key and repeat a
second time. Example: 1 - 2 - 3 - 4 - 5 - - 1 - 2 - 3 - 4 - 5 - .
After the first set the LED will flash orange and after the second it will flash
green indicating that you have successfully reprogrammed the code.
SETUP & OPERATION
STEP 3: LOCK THE SAFE:
Close the Lid and make sure that the
Open/Close Knob is in the Locked position.
.
ORDERING NEW / REPLACEMENT KEYS
The following information is required to order keys:
1. PROOF OF OWNERSHIP (1 of 2 Options Below)
SALES RECEIPT & IDENTIFICATION – INTERNATIONAL ORDERS ONLY!
Copy of sales receipt showing Store, Date & Product Description.
Copy of your picture I.D. (Drivers license, passport, regular I.D.).
PRODUCT OWNERSHIP VERIFICATION FORM
If sales receipt is not available, contact us by email or telephone to request a
“Product Ownership Verification Form”.
2. ORDER INFORMATION
CONTACT INFORMATION
Name & Shipping Address
E-mail address (If Available)
Telephone Number
Best Time to Contact You
PRODUCT INFORMATION
Safe Model #
Safe Serial #
Lock Key #
Quantity of Keys Ordered
3. PAYMENT INFORMATION
AMOUNT DUE
Per Key:
US/Canada - $12.00 (USD)
Australia - $15.00 (AUD)
Germany - €11.00 (EU)
Express Delivery:
Contact us for Additional Charges
METHOD OF PAYMENT
Telephone:
Visa or
MasterCard
Mail:
Check or
Money Order
Subject to change without prior notification.
LOCATING SAFE IDENTIFICATION NUMBERS
SERIAL NUMBER
Located on lower right corner on front of safe.
Do Not Remove Safe I.D. Tags!
KEY NUMBER
4 Digit Number etched on the metal collar
located around the key hole.
MODEL 6110G - ATTACHING SECURITY CABLE
1. Remove plug from hole on the
outer left side of the box.
1.
2. Wrap cable around object and
back through looped end.
2.
3. Depress cable release button
and hold down.
3.
4. Insert security cable into the
hole and release button.
.
4.


Product specificaties

Merk: Honeywell
Categorie: Kluis
Model: 6110

Heb je hulp nodig?

Als je hulp nodig hebt met Honeywell 6110 stel dan hieronder een vraag en andere gebruikers zullen je antwoorden


Handleiding Kluis Honeywell

Handleiding Kluis

Nieuwste handleidingen voor Kluis