Fellowes Lotus RT Handleiding
Bekijk gratis de handleiding van Fellowes Lotus RT (31 pagina’s), behorend tot de categorie Bureau. Deze gids werd als nuttig beoordeeld door 14 mensen en kreeg gemiddeld 4.5 sterren uit 7.5 reviews. Heb je een vraag over Fellowes Lotus RT of wil je andere gebruikers van dit product iets vragen? Stel een vraag
Pagina 1/31

Lotus™ RT Sit-Stand Workstation
1789 Norwood Avenue, Itasca, Illinois 60143 • 1-800-955-0959 • www.fellowes.com
B r a n d s
© 2018 Fellowes, Inc. | Part #872443 RevB
PLEASE READ INSTRUCTIONS BEFORE USE.
DO NOT DISCARD.
LIRE LES INSTRUCTIONS AVANT UTILISATION.
NE PAS JETER.
LEA LAS INSTRUCCIONES ANTES DEL USO.
NO TIRAR.
BITTE LESEN SIE DIE ANLEITUNGEN SORGFÄLTIG
DURCH, BEVOR SIE DAS GERÄT BENUTZEN.
BITTE GUT AUFBEWAHREN.
LEGGERE LE ISTRUZIONI PRIMA DELL’USO.
NON GETTARE.
LEES DE INSTRUCTIES VOOR GEBRUIK.
NIET WEGWERPEN.
LÄS DESSA INSTRUKTIONER FÖRE ANVÄNDNING.
KASSERA EJ.
PRZED UŻYCIEM PROSZĘ PRZECZYTAĆ NINIE JSZĄ
INSTRUKCJĘ. NIE WYRZUCAĆ.
ПЕРЕД ИСПОЛЬЗОВАНИЕМ ПРОСЬБА ОЗНАКОМИТЬСЯ
СИНСТРУКЦИЯМИ. НЕ ВЫБРАСЫВАТЬ.
LEIA AS INSTRUÇÕES ANTES DA UTILIZAÇÃO.
NÃO AS ELIMINE.
CUSTOMER SERVICE & SUPPORT
www.fellowes.com
U.S.: 1-800-955-0959
Europe Freephone: 00800-1810-1810
Canada: 1-800-665-4339
Mexico: 001-800-514-9057
Benelux: +31-(0)-13-458-0580
Deutschland: +49 (0)511 545489-0
France: +33 (0) 1 78 64 91 00
Italia: +39-071-730041
Polska: +48-(22)-2052110
España/Portugal: +34-91-748-05-01
United Kingdom: +44 (0) 1302 836800
Australia: 1800 33 11 77
Lotus_RT_Manual_872443_RevB_10L_052918.indd 8-1 5/29/18 1:10 PM

23
ENGLISH
Lotus™ RT Sit-Stand Workstation
CONTENTS CONTINUED
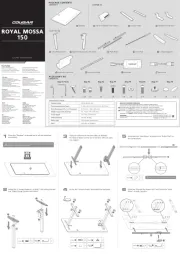
SAFETY INSTRUCTIONS/WARNING
CONTENTS
≤ 30 lbs
≤ 13.61 kg
Monitor Arm Parts
1 Cap x1
2 Pole x1
3 VESA assembly x1
4 Fitting x1
5 Cord Clip x1
Hardware
A 10.5 x 2.5mm, 16mm OD Lock Washer x1
B M4 x 10mm Socket Head Cap Screw x1
C 4mm Allen Key x1
D M10 x 2.5 Socket Head Cap Screw x1
E 8mm Hex L-Key x1
F Phillips Pan Head Screw M5x12mm
x4(Single), 8(Dual)
G Phillips Pan Head Screw M4x12mm
x4(Single), 8(Dual)
Sit-Stand Parts
6 Base + Worksurface x1
Hardware
H Clamp Support Plate x1
I 10mm wrench x1
J 6mm Allen Key x1
K 4mm Allen Key x1
L M8 x 1.25mm Thread,
65mm Long Socket
Head Screw x2
Other Tools Required
Phillips Screwdriver
• WARNING: PINCH POINT! DO NOT PUT HANDS OR OTHER OBJECTS UNDER THE PLATFORM OR ARM DURING
OPERATION. SERIOUS INJURY MAY OCCUR.
• WARNING: DO NOT EXCEED MAXIMUM STATED WEIGHT CAPACITY. SERIOUS INJURY OR PROPERTY DAMAGE
MAY OCCUR.
• CAUTION: LIFT HAZARD! TWO PEOPLE ARE REQUIRED TO MOVE THE WORKSTATION. SERIOUS INJURY OR
PROPERTY DAMAGE MAY OCCUR.
• Ensure cable lengths are long enough and follow the cable routing instruction in this manual. Failure to follow
these instructions may result in equipment damage or personal injury.
• DO NOT adjust tension setting until all equipment and accessories have been placed on the workstation.
• DO NOT lean on the keyboard platform.
• Only compatible with Fellowes Monitor Arm Kit for Lotus.
• Make sure the desk or mounting surface is level and can support the combined weight of the workstation and
accessories.
• Remove all equipment and accessories from the workstation before moving.
• Not for use with glass surfaces. Maximum desk thickness: 3” (76mm) / Minimum desk thickness ¾” (19mm)
Ensure that the sit stand is anchored tightly to the desk/table before using it to prevent injury or damage to the product.
A
A
D F x8
x4
x8
x4
F
D
E G
G
E
I K L x2J
B
B
C
C
1
6
H
1
3
4
25
3
25
4
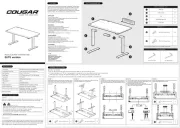
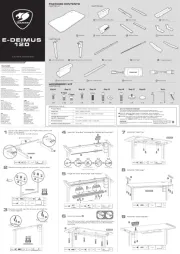
ASSEMBLY
STEP 1B
Clamp Install with Limited Space
• Use 2 people to lift the Base and Worksurface (6) out of the box
• Remove the clamp using the 4mm Allen Key (K)
• Place on the rear of the desk and re-install the clamp underneath the desk. Move to Step 1C
STEP 1A
Clamp Install for Thicker Tables
• The clamp comes assembled to accommodate tables 1 5/8” (41.27mm) thick and requires 3 13/16”(96.52mm) of clearance behind the desk. If
your table is thicker, continue with Step 1A. If your desk is close to a wall and has limited space, 1/4” to 3 13/16” (6.35mm to 96.4mm), move
to step 1B. If neither apply, move to step 1C.
• Use 2 people to lift the Base and Worksurface (6) out of the box
• On the clamp, loosen one screw and remove the other using the 4mm Allen Key (K)
• Slide the clamp off to change the orientation. Slide back on as shown in image C
• Re-install screw and tighten the other. Ensure both are securely fastened. Move to Step 1C
A
A B C
B C D
K K
KKK
≤ 5 lbs
≤ 2.27 kg
Lotus_RT_Manual_872443_RevB_10L_052918.indd 2-3 5/29/18 1:10 PM

45
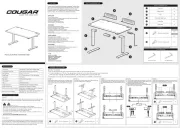
STEP 3
Raise sit-stand
• Remove the zip tie from the lever on the right side of the platform
• Engage the lever and raise the sit-stand
• (Optional) If you’d like the lever on the left side of the platform, remove the (2) M6x10mm bolts holding the handle with the 4mm Allen Key (K).
Re-attach to the left side
STEP 5
Attach Monitor(s)
• Attach your monitor(s) to the VESA assembly using the included Phillips Pan Head
Screws M5x12mm (F) or M4x 12mm (G), depending on your monitor
STEP 4A
Attach Monitor Arm
• Install Monitor Pole (2) by placing into cutout on platform and inserting M10 screw (D) with lock washer (A) through the underside of the platform
• Tighten the M10 screw (D) using 8mm Hex L-Key (E)
• Engage the lever and lower the worksurface to the desk
STEP 4B
Attach Monitor Arm
• Attach the Fitting (4) to the Monitor Pole and tighten using a Phillips screw driver when at the desired height (image A)
• Slide the VESA assembly onto the Monitor Pole (2) and tighten using the knob on the rear (images B/C)
• Insert cap onto top of pole and secure using M4 screw (B) and 4mm Allen Key (C)
Single Monitor Arm Dual Monitor Arm
A
A B
A
A B C
B
B
K
J/L
J/L
A/D/E
F/G
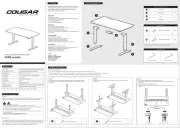
22
31/B/C
3
STEP 2
Clamp
• Insert two M8 screws (L) into the Clamp
• Place the Clamp Support Plate (H) on top of the M8 screws (L).
Ensure the tip of the screws align to the holes on the Clamp
Support Plate (H)
• Tighten the M8 screws (L) with the 6mm Allen Key (J) until the
Clamp Support Plate (H) is secured to the desk
A B C D
STEP 1C
Unbox and determine sitting home position
• Use 2 people to lift the Base and Worksurface (6) out of the box
• Slide the Base and Worksurface (6) onto the table
• Determine your desired sitting home position
Note: If your desired sitting position is in the center of the table, choose a starting position that is offset from the center (image D)
H
Lotus_RT_Manual_872443_RevB_10L_052918.indd 4-5 5/29/18 1:10 PM
Product specificaties
| Merk: | Fellowes |
| Categorie: | Bureau |
| Model: | Lotus RT |
| Kleur van het product: | Wit |
| Gewicht: | 19500 g |
| Breedte: | 901.7 mm |
| Diepte: | 603.3 mm |
| Hoogte: | 222.3 mm |
| In hoogte verstelbaar: | Ja |
| Montagewijze: | Bureau |
| Land van herkomst: | China |
| Maximale gewichtscapaciteit: | 13.61 kg |
| Frame materiaal: | Staal |
| Inclusief schroeven: | Ja |
| Draaihoek: | 180 ° |
| Aantal schroeven: | 20 |
| Montage interface compatibiliteit (min): | 75 x 75 mm |
| Montage interface compatibiliteit (max): | 100 x 100 mm |
| Aantal displays ondersteund: | 2 |
| Verbeterd kabelbeheer: | Ja |
| Hoeveelheid per (buitenste) hoofdverpakking: | 1 stuk(s) |
| Bereik kantelhoek: | 0 - 100 ° |
| Maximale schermgrootte: | 26 " |
| Code geharmoniseerd systeem (HS): | 94038900 |
| Type moersleutel: | Hexagonal wrench, Open-ended wrench |
| Hoogte verstelbaarheidsbereik: | 12 - 432 mm |
| Toetsenbordblad max. gewicht: | 2.27 kg |
| Keyboardlade: | Ja |
| Maximaal draagvermogen (per display/scherm): | 5.9 kg |
| Aantal kabelklemmen: | 1 |
| Werkoppervlakte: | 720 x 210 mm |
| Toetsenbordblad (WxD): | 738 x 267 mm |
| Sluitringen inbegrepen: | Ja |
| Inbegrepen sluitringen aantal: | 1 |
| kantel aanpassingen: | Ja |
| Schermrotatie: | Ja |
Heb je hulp nodig?
Als je hulp nodig hebt met Fellowes Lotus RT stel dan hieronder een vraag en andere gebruikers zullen je antwoorden
Handleiding Bureau Fellowes

8 December 2024

8 December 2024

8 December 2024

8 December 2024

8 December 2024

8 December 2024

8 December 2024

8 December 2024

8 December 2024

8 December 2024
Handleiding Bureau
- United Office
- Piranha
- Yaheetech
- Anthro
- Hooker
- Ergotron
- Projecta
- Manhattan
- Mount-It!
- Sandberg
- Flexa
- HJH Office
- Gamdias
- Genesis
- Worktrainer
Nieuwste handleidingen voor Bureau

8 September 2025
8 September 2025
1 September 2025

1 September 2025

1 September 2025
1 September 2025
1 September 2025

1 September 2025
14 Augustus 2025
5 Augustus 2025