Extron SF 26X Handleiding
Bekijk gratis de handleiding van Extron SF 26X (2 pagina’s), behorend tot de categorie Speaker. Deze gids werd als nuttig beoordeeld door 10 mensen en kreeg gemiddeld 4.5 sterren uit 9 reviews. Heb je een vraag over Extron SF 26X of wil je andere gebruikers van dit product iets vragen? Stel een vraag
Pagina 1/2
SF 26X • Setup Guide
This setup guide contains installation information about the Extron SF 26X two-way ceiling mount speaker. The SF 26X is an
8-ohm speaker that features an open back with a 6.5-inch woofer and a .75-inch tweeter designed for use in non-plenum
airspace environments.
WARNING:May result in serious injury. Installation and service must be performed by authorized personnel only.
Installing the SF 26X in a Suspended Ceiling
1. Remove powerfrom all devices.
NOTE:If the baffle and grille are to be painted, see
the for more information.SF 26X User Guide
2. Cut a hole for the SF 26X.Use the provided cutout
template to outline the hole to be cut in the ceiling tile as
described below.
a. Remove the ceiling tile and use the provided cutout
template to outline the hole to be cut in the tile.
b. Cut out the circle traced in the ceiling tile.
c. Replace the ceiling tile in the ceiling.
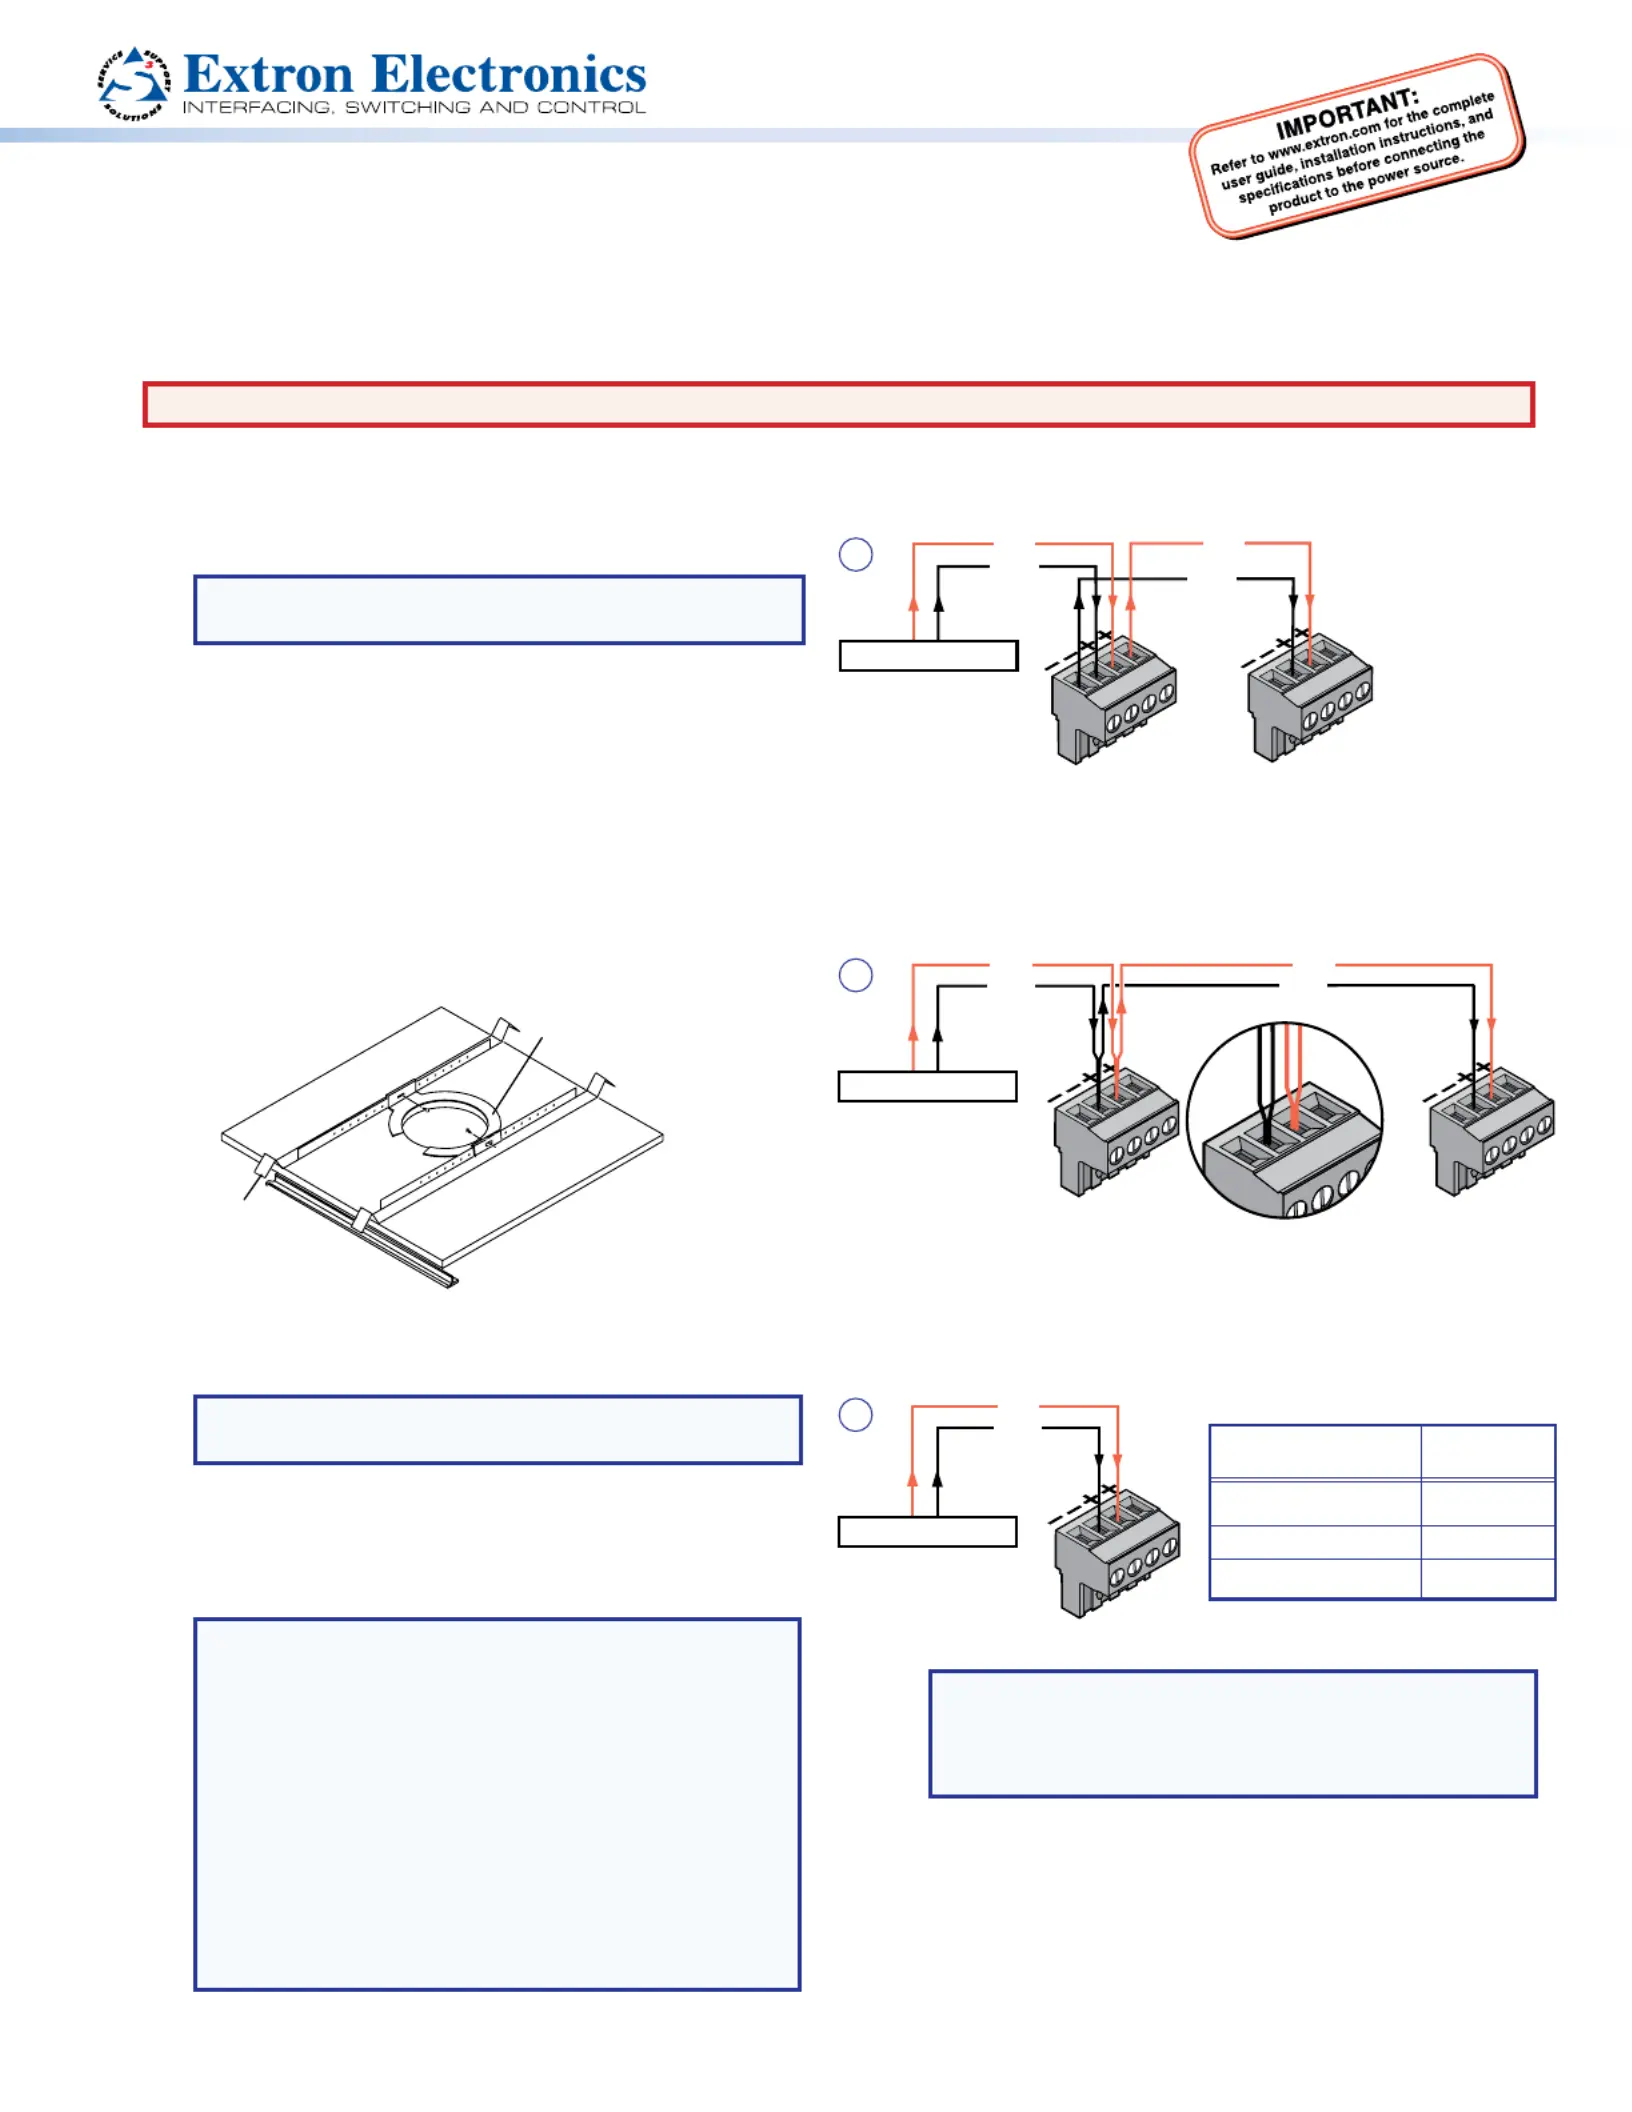
3. Install the optional SF 26X ceiling mount kit.
Attach two V-rails and one C-ring across the tile above
the hole cut in step 2 (see the illustration below).
V-rail
C-ring
4. Route the speaker wiresthrough the ceiling tile hole.
5. Remove the grille carefully from the SF 26X.
NOTE:Grille hooks are provided for grille removal, if
needed.
6. Attach speaker wires from the ceiling tile hole to the
included 4-pole captive screw connector using one of
the following three methods.
NOTES:
•See the wire gauge table at right for the
maximum number of wires per terminal.
•Do not tin the wires. Tinned wires do not hold
tight in the captive screws and can break
easily after several bends.
•See the for detailed SF 26X User Guide
information on wiring congurations.
•Strip no more than 3/16” (5 mm) of insulation
from the end of the wire before inserting it into
the captive screw connector.
NOTE:Be sure that the combined impedance of
the speaker system does not equal a value less
than the rated minimum load impedance of the
amplifier.
7. Insert the captive screw plug into the 4-pole
receptacle on the speaker crossover board as shown in
the illustration in on the next page. step 8
Wiring Multiple Speakers in Parallel
When a chain of speakers is wired in this configuration,
disconnecting one speaker does not move power from the re
remaining speaker in the chain.
Wiring Multiple Speakers Using Loop-through
When a chain of speakers is wired in this configuration,
disconnecting one speaker removes power from the
remaining speaker in the chain.
Number of Wires per
Connection Point
Maximum
Wire Gauge
1 12 GAW
2 16 GAW
4 18 GAW
Wire Gauge Table
Speaker 1
Speaker 2
Speaker 1
Speaker 2
Speaker 1
1
2
3
+
_
_+
+
_
_+
+
_
_+
_
_+
+
+
_
_+
(Bla)ck
(Red)
(Bla)ck
(Red)
(Bla)ck
(Bla)ck
(Red)
(Red)
Power Amplifier
(Red)
(Bla)ck
Power Amplifier
Power Amplifier
Product specificaties
| Merk: | Extron |
| Categorie: | Speaker |
| Model: | SF 26X |
| Kleur van het product: | Wit |
| Gewicht: | 1200 g |
| Breedte: | - mm |
| Diepte: | - mm |
| Hoogte: | - mm |
| Connectiviteitstechnologie: | Bedraad |
| Diameter: | 194 mm |
| Gemiddeld vermogen: | - W |
| Aanbevolen gebruik: | Universeel |
| Impedantie: | 8 Ohm |
| Temperatuur bij opslag: | -40 - 70 °C |
| Luchtvochtigheid bij opslag: | 10 - 90 procent |
| Audio-uitgangskanalen: | 2.0 kanalen |
| Speaker plaatsing: | Plafond-montage |
| Aantal drivers: | 2 |
| Woofer: | Ja |
| Frequentiebereik: | 50 - 20000 Hz |
| Luidspreker soort: | 2-weg |
| Versterker: | Nee |
| Diameter woofer: | 6.5 " |
| Diameter hogetonenluidspreker: | 0.75 " |
| Tweeter: | Ja |
| Bedrijfstemperatuur (T-T): | 0 - 50 °C |
| Relatieve vochtigheid in bedrijf (V-V): | 10 - 90 procent |
| Code geharmoniseerd systeem (HS): | 85182200 |
| Crossover frequentie: | 4200 Hz |
Heb je hulp nodig?
Als je hulp nodig hebt met Extron SF 26X stel dan hieronder een vraag en andere gebruikers zullen je antwoorden
Handleiding Speaker Extron

6 Mei 2026
5 Mei 2026
17 December 2025
11 Maart 2025
21 November 2024
21 November 2024
6 September 2024
6 September 2024
6 September 2024
5 September 2024
Handleiding Speaker
Nieuwste handleidingen voor Speaker
23 Juli 2026
23 Juli 2026
22 Juli 2026
22 Juli 2026
22 Juli 2026
21 Juli 2026
21 Juli 2026
21 Juli 2026
21 Juli 2026
21 Juli 2026