Digitus DC-11403 Handleiding
Digitus Niet gecategoriseerd DC-11403
Bekijk gratis de handleiding van Digitus DC-11403 (40 pagina’s), behorend tot de categorie Niet gecategoriseerd. Deze gids werd als nuttig beoordeeld door 13 mensen en kreeg gemiddeld 4.4 sterren uit 5 reviews. Heb je een vraag over Digitus DC-11403 of wil je andere gebruikers van dit product iets vragen? Stel een vraag
Pagina 1/40
USB-KVM
SWITCH
DC-11403
DC-12402
USER MANUAL REV. 1-0
Package Contents –
DIGITUS DC-11403 or DC-12402 KVM Switch
1 User Manual
Please contact your vendor if anything is missed.
Features
Controls PCs with one USB keyboard, USB mouse and monitor
respectively
Supports USB 1.1 specification
Supports speaker & microphone
Supports Windows, Linux and Macintosh
Superior video quality - Up to 1920 x 1440 pixel, DDC, DDC2,
DDC2B, DDC2AB, 200MHz
3 ways for PC selection -- Push-button switch or hot key or
mouse clicking
Easy to install--No software required
Hot Pluggable
Specifications
Function DC-11403 DC-12402
PC Connectors 2 4
Port Selection
Push-button Switch / Hot Key
/ Mouse Clicking
LEDs
On Line 2 4
Selected 2 4
Connector
-Keyboard,
Mouse
Console Port2x USB A-Type
CPU Port 2x USB B-Type 4x USB B-Type
Connector
-Monitor
Console Port1x HD-15 Female (Std. VGA/SVGA)
CPU Port
2x HD-15 Male
(Std. VGA/SVGA)
4x HD-15 Male
(Std. VGA/SVGA)
Connector
-Audio,Mic.
(Jack)
Console Port1 x Audio, Microphone
CPU Port 2 x Audio, Mic. 4 x Audio, Mic.
VGA Resolution
Max.1920x1440 pixel,DDC, DDC2,
DDC2B, DDC2AB, 200MHz
Power Adapter DC 9V 300mA (Min.) spare
Scan Interval 5 sec ~ 30 sec
Housing Metal
Weight 460 g 650 g
Dimensions (LxWxH) 128x75x45 mm 200x75X45 mm
Hardware Requirements
Requiredspecifications
Console
One high resolution VGA, SVGA or Multisync monitor
One USB mouse
One USB keyboard
One pair of speakers.
One microphone.
PC
One VGA, SVGA or Multisync card
One USB port
One audio jack port.
One microphone port.
Cable Assmann AK 8210x and AK 8230x or similar
-1-
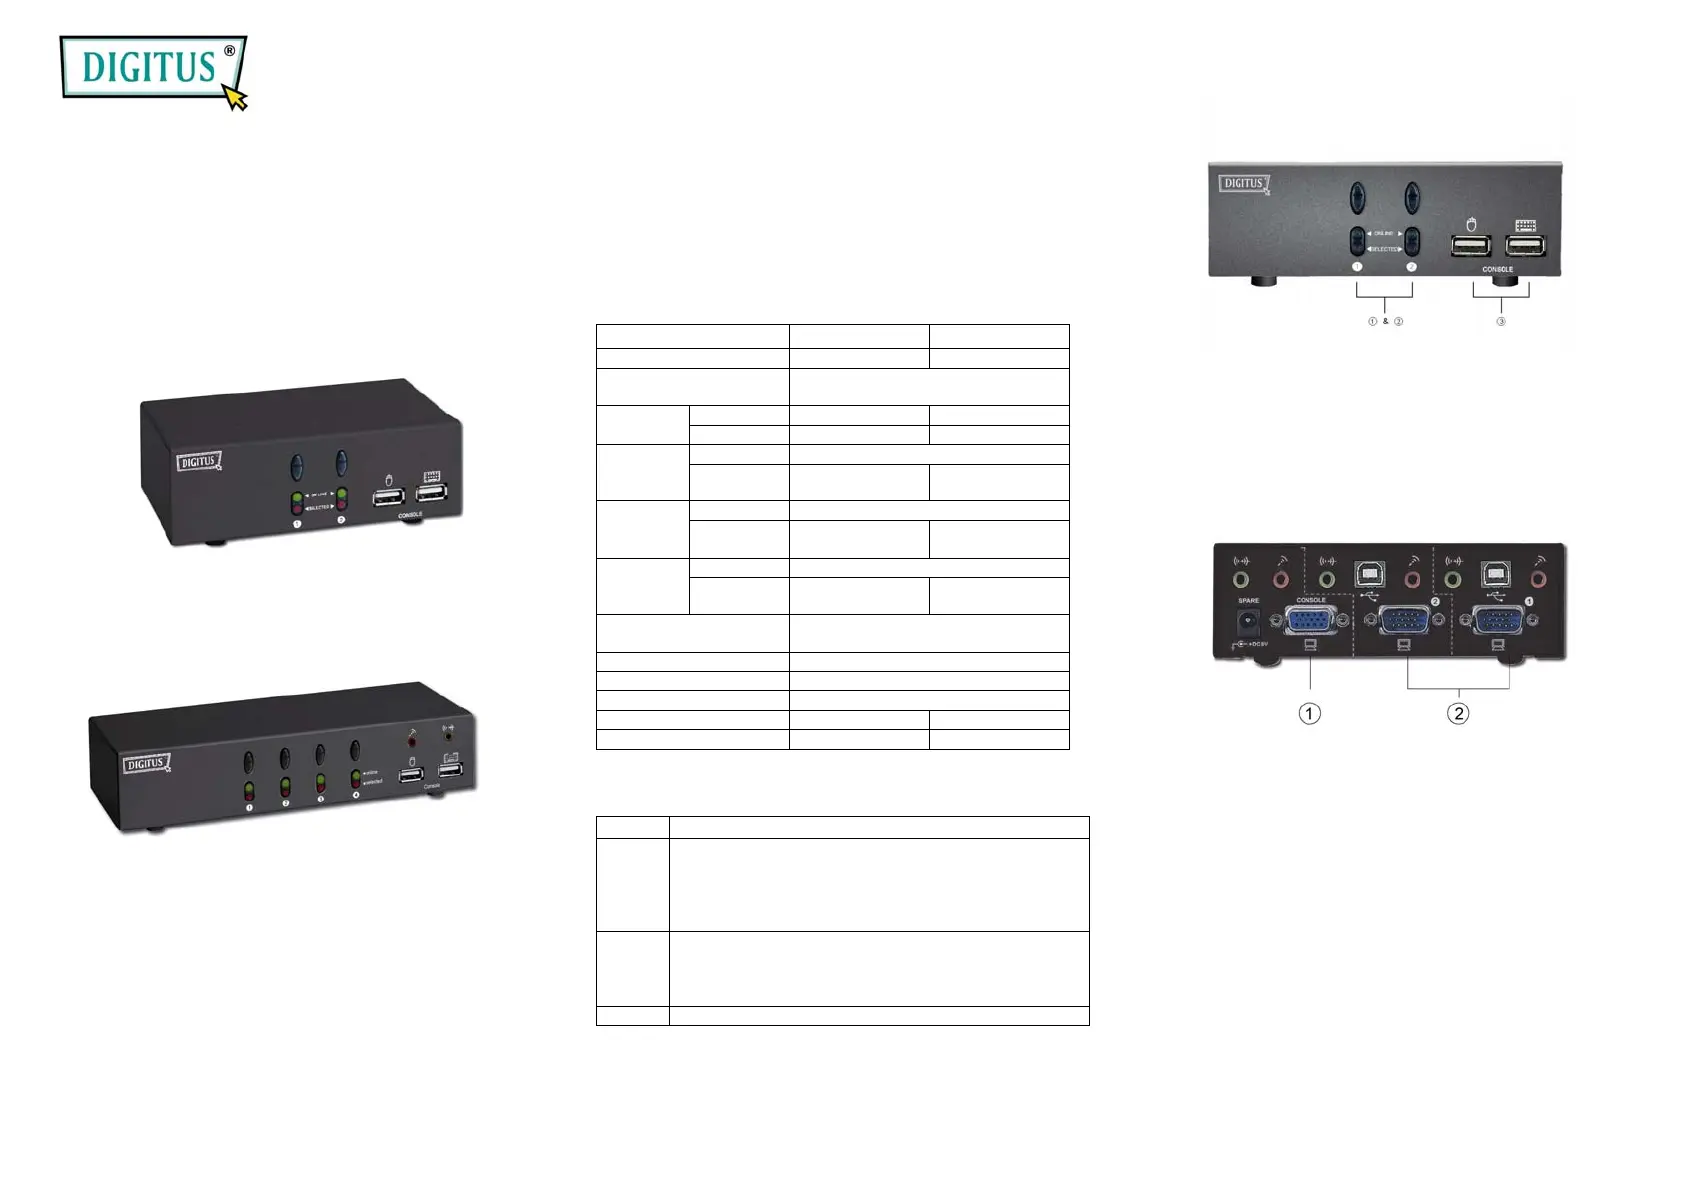
Appearance
Front View
1. Push-button Switches (Manual type)
2. Port LEDs
3. Console Keyboard and Mouse Connectors
Rear View
1. Console Monitor, Speaker and Microphone
Connectors
2. CPU Port Connectors
Installation
Before the installation, make sure the peripherals of all
PCs are grounded properly and turned off.
1. Connect the monitor, keyboard and mouse with the
Console Port Connectors.
2. Use the recommended extension cables to connect
the PCs with the CPU Ports of KVM Switch.
3. Turn on the PCs.
-2-
Product specificaties
| Merk: | Digitus |
| Categorie: | Niet gecategoriseerd |
| Model: | DC-11403 |
| Kleur van het product: | Zwart |
| LED-indicatoren: | Ja |
| Connectiviteitstechnologie: | Bedraad |
| Maximum resolutie: | 1920 x 1440 Pixels |
| Hoofdtelefoonuitgangen: | 1 |
| Certificering: | DDC, DDC2, DDC2B, DDC2AB |
| Compatibele besturingssystemen: | Win\nMac\nLinux |
| Aantal microfooningangen: | 1 |
| Aansluiting toetsenbord: | USB |
| Aansluiting muis: | USB |
| Videobandbreedte: | 200 Hz |
Heb je hulp nodig?
Als je hulp nodig hebt met Digitus DC-11403 stel dan hieronder een vraag en andere gebruikers zullen je antwoorden
Handleiding Niet gecategoriseerd Digitus

20 Mei 2026
19 Mei 2026
19 Mei 2026
15 April 2026
14 April 2026
12 April 2026
11 April 2026
4 April 2026
4 April 2026
4 April 2026
Handleiding Niet gecategoriseerd
Nieuwste handleidingen voor Niet gecategoriseerd
8 Juni 2026
8 Juni 2026
8 Juni 2026
7 Juni 2026
7 Juni 2026
7 Juni 2026
7 Juni 2026
7 Juni 2026
6 Juni 2026
6 Juni 2026