Crestron HDI-XSPA Handleiding

Crestron Receiver HDI-XSPA

Lees hieronder de 📖 handleiding in het Nederlandse voor Crestron HDI-XSPA (2 pagina's) in de categorie Receiver. Deze handleiding was nuttig voor 8 personen en werd door 2 gebruikers gemiddeld met 4.5 sterren beoordeeld

Pagina 1/2
DO GUIDE
HD(I)-XSPA
4K Ultra High-Denition 7.1 Surround Sound AV Receiver
DO Install the Device
The HD(I)-XSPA can be mounted in a rack or stacked with
other equipment. Two “ears” are provided so that the unit
can be rack mounted. These ears must be installed prior
to mounting. The only tool required is a #1 or #2 Phillips
screwdriver.
WARNING: To prevent bodily injury when mounting or
servicing this unit in a rack, observe the following guidelines:
• When mounting this unit in a partially lled rack, load
the rack from the bottom to the top with the heaviest
component at the bottom of the rack.
• If the rack is provided with stabilizing devices, install the
stabilizers before mounting or servicing the unit in the
rack.
CAUTION: To prevent equipment damage, use only the rack
ears CrestronÂŽ provides for this device.
NOTE: If rack mounting is not required, remove the feet from
the bottom of the unit with a screwdriver.
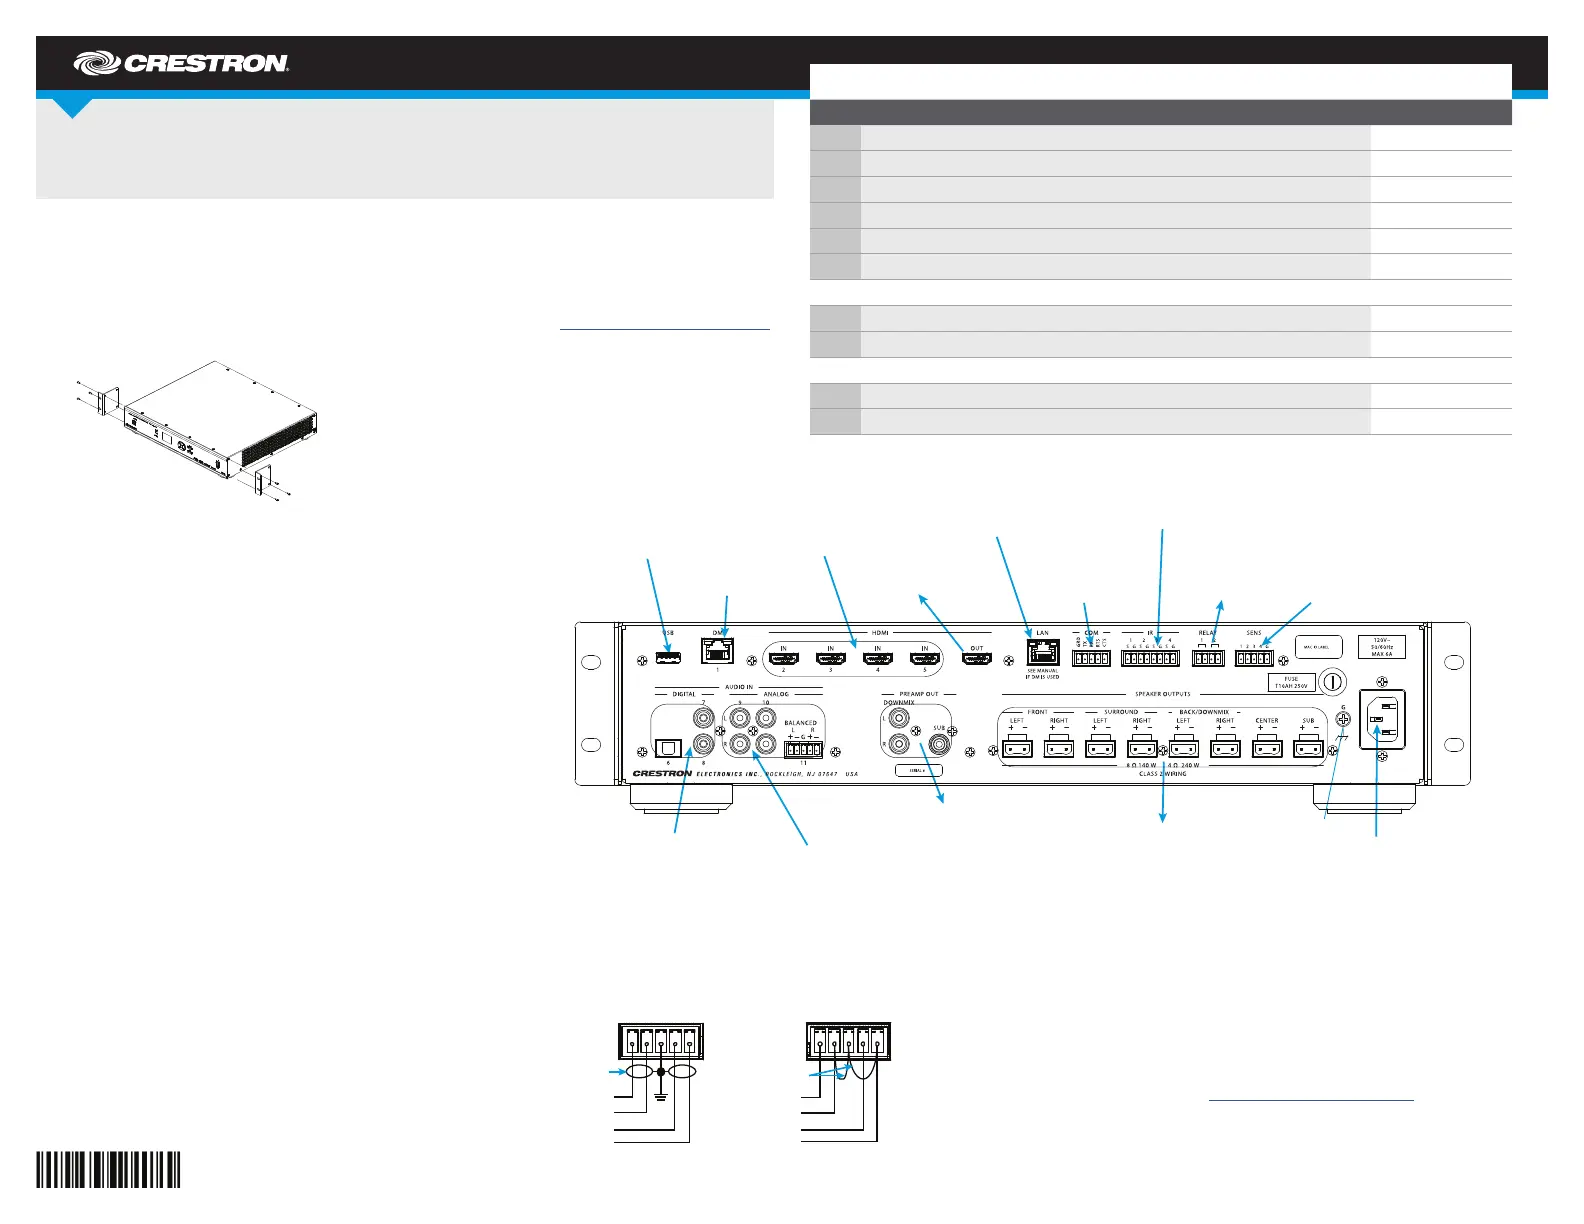
DO Make Connections to the Device
Make the necessary connections to the device as called out
in the diagram to the right. Connect the power last.
CAUTION: Keep the device unplugged until all of the input,
network, and speaker wiring is complete.
CAUTION: Check the speaker wires for shorts and frayed
wiring around the SPEAKER OUTPUTS connectors.
NOTE: The DM and LAN ports are for intra-building use only
and should not be connected to lines that run outside of the
building in which the unit is located.
NOTE: If the DM port is connected to a DMÂŽ switch, the LAN
port should not be connected to the local area network.
Additionally, the DM switch
can be used to congure the
network settings. Refer to
the DigitalMedia™ Design
Guide (Doc. 4546) at
www.crestron.com/manuals
for details.
NOTE: Ensure the unit is
properly grounded by con-
necting the chassis ground
lug to an earth ground
(building steel).
One balanced/unbalanced audio input is provided, utilizing a 5-pin terminal block connector. Refer to the following diagrams for
connecting a source.
DO Congure the Device
While the HD(I)-XSPA can be used right out of the box, the device can be
further customized with Crestron Toolbox™ or the front panel controls.
For details on using Crestron Toolbox, refer to the Crestron Toolbox help
le. For details on using the front panel controls, refer to the HD-XSPA
supplemental guide (Doc. 7448) at www.crestron.com/manuals.
DO Check the Box
QTY PRODUCT PART NUM.
2 Bracket, Rack Ear, 2U 2034434
8 Connector, 2-Pin 2012361
1 Connector, 4-Pin 2003576
3 Connector, 5-Pin 2003577
1 Connector, 8-Pin 2003580
1 Cable, USB 2.0, A - B, 6’ (1.83 m) 2014966
Items for HD-XSPA
1 Power Cord, 6' 7" (2 m) 4512528
1 Fuse, 10.0 A, Time Lag, 1.25" x 0.25", Ceramic Cartridge, 250 V 2017577
Items for HDI-XSPA
1 Varies by countryPower Cord
1 Fuse, 5.0 A, Time Lag, 5 x 20 mm, Ceramic Cartridge, 250 V 2017578
Wiring for Balanced Input
Right
Left
Shield
Wiring for Unbalanced Input
Right
Left
Jumpers
+
L R
+ - + -G
+
+
L R
+ - + -G
+
USB:
To HID-Compliant Keyboard or
Mouse
AUDIO IN (DIGITAL):
From Digital Audio Sources AUDIO IN (ANALOG):
From Analog Audio Sources
PREAMP OUT:
To Audio
Amplier
Ground
SPEAKER OUTPUTS:
To Speakers POWER:
From Line Voltage
DM:
From DigitalMedia Source
HDMIÂŽ IN:
From HDMI
Sources HDMI OUT:
To
HDMI Device
COM:
To
RS-232 Device RELAY:
To Controllable Device
SENS:
From Sensors
LAN:
10BASE-T/100BASE-TX Ethernet to
LAN
IR:
To IR Controlled Devices
DO GUIDE DOC. 7730B (2042843) 09.15
Specications subject t o change without notice.
DO Operate the Device
Switch the Power
To turn the amplier and audio outputs on,
move the POWER switch to |. To turn the
amplier and audio outputs off, move the
POWER switch to . This will also reset the
unit.
Select a Source or Decoding Mode
1. Press , followed by the center of HOME
the Nav Pad.
2. Press up or down on the Nav Pad to
highlight Source, and then press the
center of the Nav Pad to select a source
or decoding mode.
• Select a source:
a. Press up or down on the
Nav Pad to highlight Source
Select and press the center of
the Nav Pad.
b. Press up or down on the Nav
Pad to highlight the desired
source and press the center of
the Nav Pad.
• Select a decoding mode:
a. Press up or down on the Nav
Pad to highlight Decoding
Mode and press the center of
the Nav Pad.
b. Press up or down on the Nav
Pad to highlight the desired
decoding mode and press the
center of the Nav Pad.
Adjust Volume and Mute
(Theater Output Only)
To adjust the theater output’s volume level,
press or VOL VOL .
NOTE: The downmix output’s volume level
is adjusted via control system programming.
To mute the theater output, press . An MUTE
indicator lights on the bottom of the display.
Press MUTE again to unmute the output.
NOTE: The downmix output’s mute function
is controlled from the front panel controls.
For details on using the front panel controls,
refer to the HD-XSPA supplemental guide
(Doc. 7448) at www.crestron.com/manuals.
Other Functions
Other functions are available using the front
panel controls. For details on using the
front panel controls, refer to the HD-XSPA
supplemental guide (Doc. 7448) at
www.crestron.com/manuals.
DO Learn More
Visit the website for additional information and
the latest rmware updates. To learn more about
this product, use a QR reader application on your
mobile device to scan the QR image.
Crestron Electronics
15 Volvo Drive, Rockleigh, NJ 07647
888.CRESTRON
www.crestron.com
As of the date of manufacture, the product has been tested and found to comply with specications for CE marking.
The HD-XSPA is listed to applicable UL Standards and requirements by Underwriters Laboratories Inc.
Federal Communications Commission (FCC) Compliance Statement
This device complies with part 15 of the FCC Rules. Operation is subject to the following conditions:
(1) This device may not cause harmful interference and (2) this device must accept any interference received, including interference
that may cause undesired operation.
CAUTION: Changes or modications not expressly approved by the manufacturer responsible for compliance could void the
user’s authority to operate the equipment.
NOTE: This equipment has been tested and found to comply with the limits for a Class B digital device, pursuant to part 15 of the
FCC Rules. These limits are designed to provide reasonable protection against harmful interference in a residential installation.
This equipment generates, uses and can radiate radio frequency energy and, if not installed and used in accordance with the
instructions, may cause harmful interference to radio communications. However, there is no guarantee that interference will not
occur in a particular installation.
If this equipment does cause harmful interference to radio or television reception, which can be determined by turning the
equipment off and on, the user is encouraged to try to correct the interference by one or more of the following measures:
• Reorient or relocate the receiving antenna.
• Increase the separation between the equipment and receiver.
• Connect the equipment into an outlet on a circuit different from that to which the receiver is connected.
• Consult the dealer or an experienced radio/TV technician for help.
Industry Canada (IC) Compliance Statement
CAN ICES-3(B)/NMB-3(B
Rack Mounting Safety Precautions
• Elevated Operating Ambient Temperature: If installed in a closed or multi-unit rack assembly, the operating ambient temperature of the rack
environment may be greater than room ambient temperature. Therefore, consideration should be given to installing the equipment in an environment
compatible with the maximum ambient temperature (Tma) specied by the manufacturer.
• Reduced Airow: Installation of the equipment in a rack should be such that the amount of airow required for safe operation of the equipment is not
compromised.
• Mechanical Loading: Mounting of the equipment in the rack should be such that a hazardous condition is not achieved due to uneven mechanical
loading.
• Circuit Overloading: Consideration should be given to the connection of the equipment to the supply circuit and the effect that overloading of the
circuits might have on overcurrent protection and supply wiring. Appropriate consideration of equipment nameplate ratings should be used when
addressing this concern.
• Reliable Earthing: Reliable earthing of rack-mounted equipment should be maintained. Particular attention should be given to supply connections other
than direct connections to the branch circuit (e.g., use of power strips).
Electrical Connection
“This product must be connected to an earthed mains socket-outlet.”
• Finland: “Laite on liitettävä suojamaadoituskoskettimilla varustettuun pistorasiaan.”
• Norway: “Apparatet må tilkoples jordet stikkontakt.”
• Sweden: “Apparaten skall anslutas till jordat uttag.”
The specic patent s that cover Crestron products are listed at . Product warranty can be found at .ht t p://www.crestron.com/ legal/patent s/ www.crestron.com/warranty
Cert ain Crestron products contain open source software. For specic information, please visit www.crestron.com/opensource
Crestron, the Crestron logo, Crest ron Toolbox, DigitalMedia, and DM are either trademarks or registered trademarks of Crest ron Electronics, Inc. in t he United St ates and/or other countries.
HDMI is either a trademark or registered t rademark of HDMI Licensing, LLC in the Unit ed States and/or other countries. Other t rademarks, registered trademarks, and trade names may be
used in this document to refer to either the entities claiming t he marks and names or t heir products. Crest ron disclaims any proprietary interest in t he marks and names of others. Crestron is
not responsible for errors in typography or phot ography.
This document was writ ten by the Technical Publications department at Crestron.
Š2015 Crestron Electronics, Inc.
Current Source
Source Select
Decoding Mode
None


Product specificaties

Merk: Crestron
Categorie: Receiver
Model: HDI-XSPA
Kleur van het product: Zwart
Gewicht: 15000 g
Breedte: 483 mm
Diepte: 401 mm
Hoogte: 104 mm
Soort: AV-receiver
Connectiviteitstechnologie: Bedraad
Ethernet LAN: Ja
Maximum resolutie: 4096 x 2160 Pixels
Aantal USB-aansluitingen: 1
Audio-ingangen: 2
Materiaal: Metaal
Audio (L,R) out: 1
HDMI in: 5
Aantal HDMI-uitgangen: 1
RJ-45 invoer ports: 1
Maximaal bereik: 100 m
AC-ingangsspanning: 220-240 V
AC-ingangsfrequentie: 50 - 60 Hz
Stroomverbruik (typisch): 53 W
Bedrijfstemperatuur (T-T): 5 - 40 °C
Relatieve vochtigheid in bedrijf (V-V): 10 - 90 procent

Heb je hulp nodig?

Als je hulp nodig hebt met Crestron HDI-XSPA stel dan hieronder een vraag en andere gebruikers zullen je antwoorden


Handleiding Receiver Crestron

Handleiding Receiver

Nieuwste handleidingen voor Receiver