Crestron FT2A-CHGR-USBA-BASIC Handleiding
Crestron Niet gecategoriseerd FT2A-CHGR-USBA-BASIC
Bekijk gratis de handleiding van Crestron FT2A-CHGR-USBA-BASIC (2 pagina’s), behorend tot de categorie Niet gecategoriseerd. Deze gids werd als nuttig beoordeeld door 35 mensen en kreeg gemiddeld 4.3 sterren uit 8 reviews. Heb je een vraag over Crestron FT2A-CHGR-USBA-BASIC of wil je andere gebruikers van dit product iets vragen? Stel een vraag
Pagina 1/2
The Crestron® FT2A-CHGR-USBA-BASIC is a
single-slot module designed for installation in Crestron
FT2 FlipTop™ cable management assemblies. This module
provides two USB Type-A charging ports, which may be
used simultaneously to quickly charge two mobile phones,
laptops, or tablet devices at the table. The module is
engraved with the icon depicting the international symbol
for a high-powered USB charging port.
NOTE: The rapidity of the charge depends on the connected
device and how much power it draws.
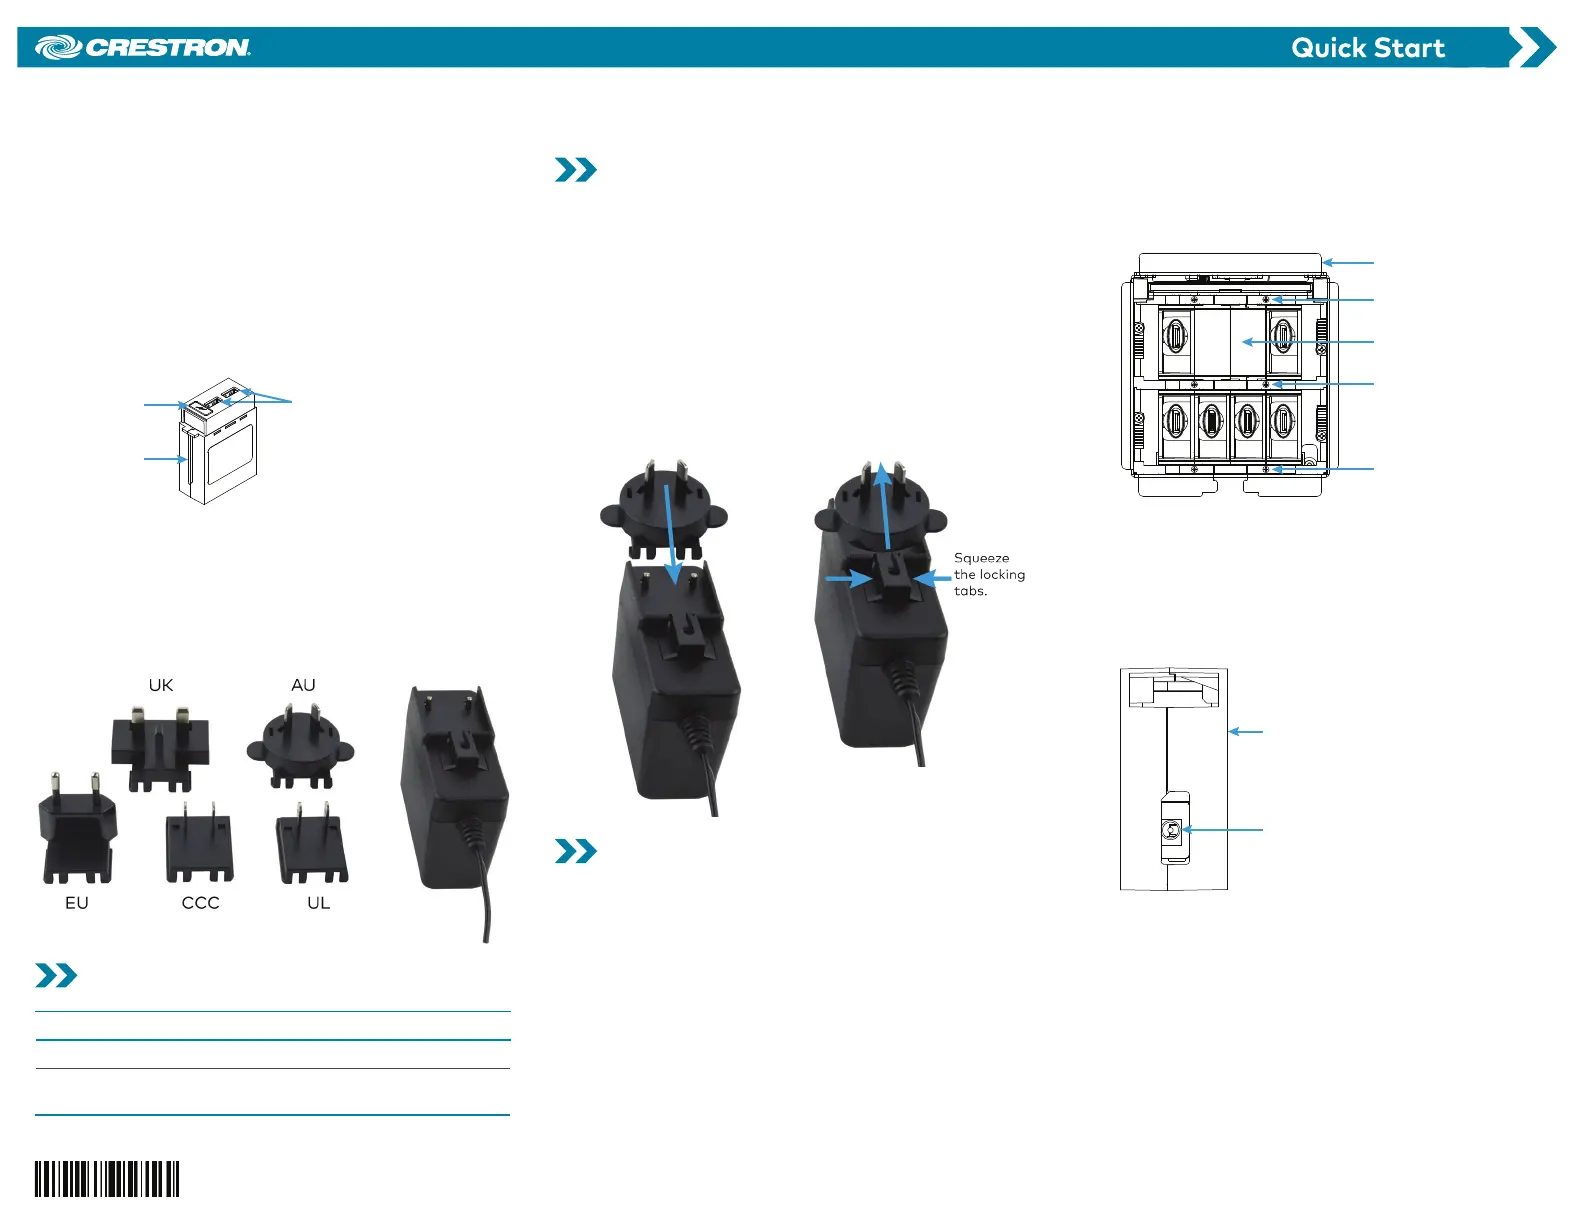
FT2A-CHGR-USBA-BASIC Module
Engraved icon
USB Type-A
charging port (2)
Front guide rib
An included power pack provides 5 amps (maximum) to
the module for simultaneous charging of two standard
USB loads. Each USB Type-A port supplies a maximum of
2.4 amps charging current with short circuit and overload
protection. The power pack has a 6 ft (1.83 m) cord and
five detachable plugs (UK, AU, EU, CCC, and UL) to
accommodate international standards.
Power Pack with Plugs (Included)
Check the Box
ItemQty
FT2A-CHGR-USBA-BASIC1
Power Pack, 5 VDC 5 A, 100-240 VAC,
PW-0550WU (P/N 2053365)
1
Assemble the Power Pack
Assemble the included power pack before connecting it to
the module.
1. Select the detachable power plug appropriate for
your region. Follow the plug and socket standards of
the installation site.
2. Place the detachable plug onto the power pack, and
slide the plug downward toward the locking tabs. The
plug clicks into place.
NOTE: To remove a plug from the power pack, squeeze
the locking tabs together and slide the plug upward
off of the power pack.
Attach Plug Remove Plug
Install the Module
Install the FT2A-CHGR-USBA-BASIC module into the FT2
FlipTop assembly. If the bezel and locking bars have not
been installed on the FT2 FlipTop assembly, skip to step 4.
1. Tap the lid retraction button to retract the one-touch
lid, which disappears into the FT2 FlipTop assembly. If
the assembly has two lids, open both.
2. Remove and retain the magnetic bezel from the FT2
FlipTop assembly by grasping the inside of the bezel
and firmly pulling it up and away from the assembly
until the magnetic hold is broken.
3. Using a manual torque screwdriver, unscrew, remove,
and retain the two locking bars on either side of the
module row where the module is to be installed.
NOTE: In this example, an FT2A-CHGR-USBA-BASIC
module replaces a preinstalled blank plate module
inside the FT2-500-MECH.
Remove Two Locking Bars
FlipTop
assembly
Remove and
retain locking bar.
Replace blank
plate module.
Remove and
retain locking bar.
Do not remove
locking bar.
4. Lift and remove the blank plate module that occupies
the module slot where the module is to be installed.
5. Feed the 3.5 mm barrel plug of the power pack from
the bottom of the FT2 FlipTop assembly through the
empty module slot.
6. Connect the plug to the DC power jack of the module.
FT2A-CHGR-USBA-BASIC Module (Bottom View)
DC power jack
FT2A-CHGR-USBA-BASIC
module
7. Orient the module so that the module’s engraved
icon is facing toward the front of the FT2 FlipTop
assembly.
FT2A-CHGR-USBA-BASIC
USB Rapid Charging Module for FT2 Series, Mechanical
Product specificaties
| Merk: | Crestron |
| Categorie: | Niet gecategoriseerd |
| Model: | FT2A-CHGR-USBA-BASIC |
Heb je hulp nodig?
Als je hulp nodig hebt met Crestron FT2A-CHGR-USBA-BASIC stel dan hieronder een vraag en andere gebruikers zullen je antwoorden
Handleiding Niet gecategoriseerd Crestron

26 Mei 2026
7 Maart 2026
4 Maart 2026
28 Januari 2026
27 Januari 2026
4 December 2025
3 December 2025
2 December 2025
2 December 2025
2 December 2025
Handleiding Niet gecategoriseerd
Nieuwste handleidingen voor Niet gecategoriseerd
23 Juli 2026
23 Juli 2026
23 Juli 2026
23 Juli 2026
23 Juli 2026
23 Juli 2026
23 Juli 2026
23 Juli 2026
23 Juli 2026
22 Juli 2026