Citizen Promaster AIR Automatic GMT NB6046-59E Handleiding
Bekijk gratis de handleiding van Citizen Promaster AIR Automatic GMT NB6046-59E (6 pagina’s), behorend tot de categorie Horloge. Deze gids werd als nuttig beoordeeld door 237 mensen en kreeg gemiddeld 5.0 sterren uit 7 reviews. Heb je een vraag over Citizen Promaster AIR Automatic GMT NB6046-59E of wil je andere gebruikers van dit product iets vragen? Stel een vraag
Pagina 1/6
1/6
9054 instruction manual
Thank you for your purchase of this Citizen watch.
Before using the watch, read this instruction manual (PDF) carefully to ensure correct use.
Caliber No. of this watch:
9054
You can access the web instruction manual in addition by using the QR code or the URL:
https://www.citizenwatch-global.com/support/html/en/9054/9054.html
Some models may be equipped with enhanced features functions such as slide rules and tachymeters. To see how to use such features and functions, which is not covered
with the instruction manual, and other information, access the CITIZEN support page (
https://www.citizenwatch-global.com/support/
).
ENGLISH
Safety precautions — IMPORTANT
This manual contains instructions that should be strictly followed at all times
not only for optimal use, but to prevent any injuries to yourself, other persons or
property. We encourage you to read the entire booklet (especially, page
6
) and
understand the meaning of the following symbols:
⿎
Safety advisories are categorized and depicted in this manual as follows:
DANGER
Highly likely to cause death or serious injury
WARNING
Can cause serious injury or death
CAUTION
Can or will cause minor or moderate injury or damage
⿎
Important instructions are categorized and depicted in this manual as follows:
(Following symbols are examples of Pictograms.)
Warning (caution) symbol followed by prohibited matters.
Warning (caution) symbol followed by instructions that should be followed or
precautions that should be observed.
Features
■
Times of two places can be shown at the same time with the hour and 24-
hour hands.
The hour hand and the date indication can be moved freely without stopping the watch.
You can easily adjust them to a new time such as that of your destination.
■
The third time can be read by using the rotating bezel.
You can read time of one other area than those indicated with the hour hand or the 24-hour
hand by calculating time difference from that indicated with the 24-hour hand and moving
the rotating bezel according to the calculation result.
CONTENTS
Before using this watch ...........................................................1
Component identification .......................................................2
Winding the mainspring .........................................................2
Winding the mainspring manually ..........................................................2
Setting the 24-hour hand and the hour hand
to the same time and calendar ..............................................2
Indicating the time and calendar of another area ....................3
Using the rotating bezel ..........................................................4
About mechanical watches ......................................................5
Troubleshooting .....................................................................5
Water resistance .....................................................................6
Precautionary items and usage limitations ..............................6
Specifications .........................................................................6
Before using this watch
Band adjustment
We recommend seeking the assistance of an experienced watch technician for sizing
of your watch. If adjustment is not done correctly, the bracelet may unexpectedly
become detached leading to loss of your watch or injury (excluding products
containing the band adjustment tool).
Consult an authorized service center.
Protective stickers
Be sure to remove any protective stickers that may be on your watch (case back,
band, clasp, etc.). Otherwise, perspiration or moisture may enter the gaps between
the protective stickers and the parts, which may result in a skin rash and/or
corrosion of the metal parts.
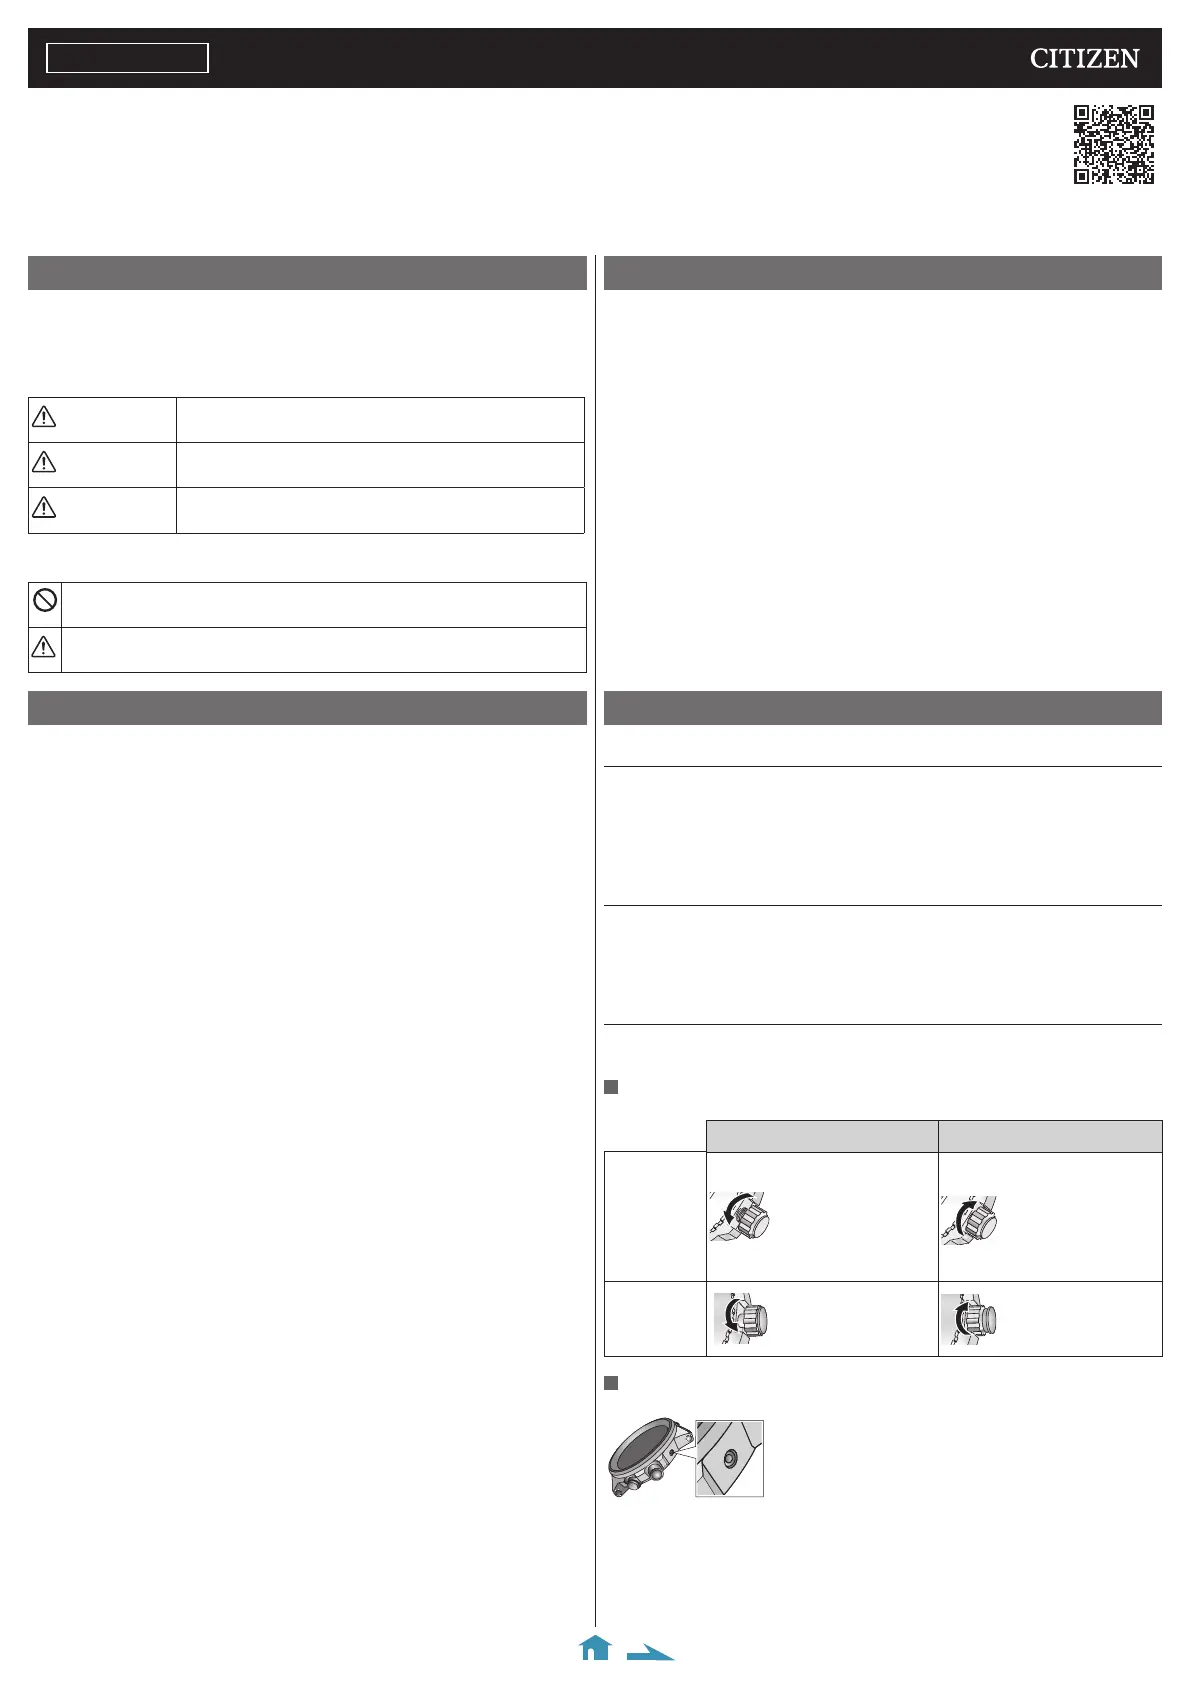
How to use a specially designed crown/button
Some models are equipped with a specially designed crown and/or push button to
prevent accidental operation.
Screw down crown/button
Unlock the crown/button prior to operate your watch.
UnlockLock
Screw down
crown
Rotate the crown
counterclockwise until
it releases from the case.
Push the crown in to
the case. With gentle
pressure towards the
case, rotate the crown
clockwise to secure it
to the case. Be sure to
tighten firmly.
Screw down
push button
Rotate the locking screw
counterclockwise, and
loosen until it stops.
Rotate the locking
screw clockwise, and
tighten firmly.
Recessed button
Press the button with a non-marring narrow-tipped object.
• Metal objects may cause marring or scratching of the button.
Product specificaties
| Merk: | Citizen |
| Categorie: | Horloge |
| Model: | Promaster AIR Automatic GMT NB6046-59E |
Heb je hulp nodig?
Als je hulp nodig hebt met Citizen Promaster AIR Automatic GMT NB6046-59E stel dan hieronder een vraag en andere gebruikers zullen je antwoorden
Handleiding Horloge Citizen

25 Maart 2025
25 Maart 2025
25 Maart 2025
25 Maart 2025
25 Maart 2025
25 Maart 2025
25 Maart 2025
25 Maart 2025
Handleiding Horloge
Nieuwste handleidingen voor Horloge
22 Juni 2026
5 Mei 2026
5 Mei 2026
30 Maart 2026
3 Januari 2026
17 December 2025
11 December 2025
11 December 2025
11 December 2025