Cherry MW 5180 Handleiding
Cherry Niet gecategoriseerd MW 5180
Bekijk gratis de handleiding van Cherry MW 5180 (2 pagina’s), behorend tot de categorie Niet gecategoriseerd. Deze gids werd als nuttig beoordeeld door 63 mensen en kreeg gemiddeld 4.6 sterren uit 6 reviews. Heb je een vraag over Cherry MW 5180 of wil je andere gebruikers van dit product iets vragen? Stel een vraag
Pagina 1/2
1
①Batterie
②Empfänger für Funkverbindung
③Schalter Aus (off)/Funk (RF)/Bluetooth (BT)
④Taste für Bluetooth- und Funkverbindung
⑤Status-LED für Ladezustand der Batterie,
Bluetooth- oder Funkverbindung
Bevor Sie beginnen ...
Die CHERRY MW 5180 ist eine kabellose Maus zur
Bedienung von PCs/Notebooks.
Für Informationen zu weiteren Produkten, Downloads
und vielem mehr, besuchen Sie bitte www.cherry.de.
1Zu Ihrer Sicherheit
Erstickungsgefahr durch Verschlucken von
Kleinteilen
•Bewahren Sie das Gerät außerhalb der Reichweite
von Kindern unter 3 Jahren auf.
Explosionsgefahr durch falsche oder falsch
eingelegte Batterie
•Verwenden Sie nur Batterien des in den
Technischen Daten genannten Typs.
•Legen Sie die Batterie entsprechend der
Markierungen (+/-) im Batteriefach ein.
"Repetitive Strain Injury" = "Verletzung durch
wiederholte Beanspruchung"
RSI entsteht durch kleine, sich ständig
wiederholende Bewegungen.
•Richten Sie Ihren Arbeitsplatz ergonomisch ein.
•Positionieren Sie Tastatur und Maus so, dass sich
Ihre Oberarme und Handgelenke seitlich vom
Körper befinden und ausgestreckt sind.
•Machen Sie mehrere kleine Pausen, ggf. mit
Dehnübungen.
•Ändern Sie oft Ihre Körperhaltung.
2Beschädigungen vermeiden
Löschen von Speichermedien und Beschädigung von
mechanischen Uhren durch Magnet in der Maus
•Bringen Sie keine Speichermedien, wie
Magnetkarten oder externe Festplatten, und keine
mechanischen Uhren näher als 10 cm zur Maus.
3Maus mit einem Gerät verbinden
Sie können die Maus über Bluetooth oder mit dem
Empfänger über eine 2,4 GHz-Funkverbindung mit
dem PC/Notebook oder anderen Geräten verbinden.
Die Verbindung über Bluetooth ist bequem, wenn Sie
die Maus an mehreren Geräten verwenden möchten:
Sie müssen die Verbindung nur einmal herstellen
und benötigen den Empfänger nicht. Außerdem
können Sie über Bluetooth bis zu 3 Geräte dauerhaft
mit der Maus verbinden und zwischen ihnen
wechseln.
DE BEDIENUNGS-
ANLEITUNG
Jedes Gerät ist anders!
In der Bedienungsanleitung erhalten Sie
Hinweise zur effektiven und zuverlässigen
Verwendung.
•Lesen Sie die Bedienungsanleitung
aufmerksam durch.
•Bewahren Sie die Bedienungsanleitung auf und
geben Sie sie an andere Benutzer weiter.
3.1Maus über Bluetooth verbinden
1Öffnen Sie an Ihrem PC/Notebook die Suche nach
Bluetooth-Geräten (zum Beispiel über Start >
Einstellungen > Geräte > Bluetooth).
2Legen Sie die Batterie in die Maus ein.
3Stellen Sie den Schalter an der Unterseite der
Maus auf "BT".
•Falls Sie die Maus mit verschiedenen PCs/Note-
books verbinden möchten: Drücken Sie den Knopf
an der Unterseite der Maus, bis der gewünschte
Kanal angezeigt wird (siehe 4 "Bluetooth-Kanal
wählen").
4Halten Sie den Knopf an der Unterseite der Maus
3 Sekunden lang gedrückt, bis die LED blinkt.
Ab diesem Zeitpunkt können Sie innerhalb von
60 Sekunden eine Verbindung aufbauen.
5Folgen Sie den Anweisungen der Software.
Die LED erlischt und die Maus ist mit Ihrem PC/
Notebook verbunden.
3.2Maus über Empfänger verbinden
Der Empfänger befindet sich in einem Fach unter der
Abdeckung der Maus und wird durch einen Magneten
gehalten.
1Legen Sie die Batterie in die Maus ein.
2Ziehen Sie den Empfänger aus dem Gehäuse.
3Schließen Sie den Empfänger möglichst an einer
USB 2.0-Buchse des PCs/Notebooks an (diese hat
meist eine weiße oder schwarze Führung).
4Stellen Sie auf der Unterseite der Maus den
Schalter auf "RF".
Die Maus ist mit Ihrem PC/Notebook verbunden.
4Bluetooth-Kanal wählen
Sie können die Maus mit drei verschiedenen Geräten
verbinden. Dazu stehen Ihnen drei Kanäle zur
Verfügung.
•Drücken Sie die Taste an der Unterseite der Maus,
bis der gewünschte Kanal angezeigt wird.
Je nach Kanal blinkt die LED 1 x (1. Kanal),
2 x (2. Kanal) oder 3 x (3. Kanal).
5Empfänger in der Maus verstauen
Der Empfänger ist so klein, dass er auch beim
Transport eines Notebooks in der USB-Buchse
bleiben kann. Zum Schutz vor Verschmutzung und
Verlust ziehen Sie den Empfänger ab und deponieren
ihn in der Maus.
6 Mausuntergrund
Eine helle, strukturierte Fläche als Mausuntergrund
steigert die Effektivität der Maus, spart Energie und
gewährleistet eine optimale Bewegungserkennung.
Eine spiegelnde Fläche ist als Mausuntergrund nicht
geeignet.
7Maus ein-/ausschalten
Die Maus schaltet bei Nichtbenutzung in einen
Schlaf-Modus, in dem sie fast keine Energie benötigt.
Beim ersten Tastendruck schaltet sie sich
automatisch wieder ein.
Weil sie im Energiesparmodus trotzdem Energie
verbraucht, sollten Sie sie bei längerer
Nichtbenutzung und zum Transport manuell
ausschalten.
•Schieben Sie den Schalter auf der Mausunterseite
in die entsprechende Position:
Aus = off
Ein (Funk) = RF (die LED leuchtet 5 Sekunden lang)
Ein (Bluetooth) = BT (die LED leuchtet 5 Sekunden
lang)
8 Batteriestatus
Wenn die Spannung der Batterie der Maus nachlässt,
blinkt die LED 10 x.
•Wechseln Sie die Batterie möglichst bald.
9Maus reinigen
1Schalten Sie die Maus aus.
HINWEIS: Beschädigung durch aggressive
Reinigungsmittel oder Flüssigkeit in der Maus
•Verwenden Sie zur Reinigung keine Lösungsmittel
wie Benzin oder Alkohol und keine Scheuermittel
oder Scheuerschwämme.
•Verhindern Sie, dass Flüssigkeit in die Maus
gelangt.
2Reinigen Sie die Maus mit einem leicht feuchten
Tuch und etwas mildem Reinigungsmittel
(z. B. Geschirrspülmittel).
3Trocknen Sie die Maus mit einem fusselfreien,
weichen Tuch.
Bluetooth-Version
Sie benötigen einen PC/Notebook mit
einem Bluetooth-Empfänger, der
mindestens Bluetooth 4.0 unterstützt.
10Falls die Maus nicht funktioniert
•Schalten Sie die Maus aus und wieder ein.
•Prüfen Sie, ob die Batterie korrekt eingelegt ist
und genügend Spannung hat.
•Entfernen Sie störende Gegenstände zwischen der
Maus und dem PC/Notebook. Störend sind vor
allem metallische oder elektrische Gegenstände,
wie Kabel, Lautsprecher oder USB-Hubs.
•Verringern Sie den Abstand zwischen der Maus
und dem PC/Notebook.
•Falls es bei der Nutzung von USB 3.0-Geräten in
der direkten Umgebung des Empfängers zu
Störungen kommt: Verwenden Sie für den
Empfänger oder das USB 3.0-Gerät einen
entfernteren Anschluss, ein zusätzliches Kabel
oder einen USB-Hub.
10.1Störung der Bluetooth-Verbindung
beseitigen
•Prüfen Sie, ob Sie den richtigen Kanal eingestellt
haben (siehe 4 "Bluetooth-Kanal wählen").
•Prüfen Sie, ob der interne Empfänger Ihres PCs/
Notebooks mindestens dem Bluetooth Standard
4.0 entspricht. Niedrigere Versionen werden nicht
unterstützt.
•Wenn sich Ihr PC/Notebook im Standby-Modus
befindet, ist ein Aufwecken über Bluetooth-Geräte
nicht möglich. Schalten Sie den PC/Notebook
manuell ein.
•Schalten Sie unbenötigte Bluetooth-Geräte aus.
•Entfernen Sie die Maus in der Bluetooth-Software
und fügen Sie sie als neues Gerät wieder hinzu.
•Verwenden Sie einen externen Bluetooth-Empfän-
ger.
•Setzen Sie die Maus auf die Werkseinstellungen
zurück: Halten Sie das Mausrad gedrückt wäh-
rend Sie die Maus einschalten und halten Sie es
weitere 3 Sekunden gedrückt. Anschließend sind
alle 3 Kanäle gelöscht.
•Schließen Sie die Maus über den Empfänger an.
10.2Störung der Verbindung über den
Empfänger beseitigen
•Schließen Sie den Empfänger an einer USB 2.0-
Buchse des PCs/Notebooks an (diese hat meist
eine weiße oder schwarze Führung). An USB 3.0-
Buchsen (blaue Führung) kommt es manchmal zu
Fehlfunktionen.
•Schließen Sie den Empfänger an einer anderen
USB 2.0-Buchse am PC/Notebook an.
•Verringern Sie den Abstand zwischen dem Emp-
fänger und der Maus, indem Sie den Empfänger
an einer USB-Buchse anschließen, die sich nah an
der Maus befindet.
•Verwenden Sie ein USB-Verlängerungskabel, um
den Empfänger möglichst nah an der Maus zu
platzieren.
•Wenn die Maus die Verbindung zum Empfänger
verloren hat, stellen Sie mit den folgenden
Schritten eine neue Verbindung her:
1Schalten Sie die Maus aus.
2Ziehen Sie den Empfänger aus der USB-
Buchse.
3Stellen Sie auf der Unterseite der Maus den
Schalter auf "RF".
4Drücken Sie den Knopf an der Unterseite der
Maus 3 Sekunden lang.
Die LED beginnt zu blinken.
5Schließen Sie innerhalb von 30 Sekunen den
Empfänger an einer USB 2.0-Buchse am PC/
Notebook an und platzieren Sie die Maus so
nah wie möglich am Empfänger.
Wenn die LED erlischt, ist die neue Verbindung
hergestellt.
11Geräte entsorgen
•Entsorgen Sie Geräte mit diesem Symbol
nicht mit dem Hausmüll.
•Entsorgen Sie die Geräte, entsprechend
den gesetzlichen Vorschriften, bei Ihrem
Händler oder den kommunalen
Sammelstellen.
Betrieb mehrerer Bluetooth-Geräte an
einem PC/Notebook
Wenn zu viele Bluetooth-Geräte ange-
schlossen sind, können die im PC/Notebook integ-
rierten Bluetooth-Empfänger überfordert sein.
12Technische Daten
13 Kontakt
Cherry Europe GmbH
Cherrystraße 2
91275 Auerbach/OPf.
Internet: www.cherry.de
Telefon: +49 (0) 9643 2061-100*
*zum Ortstarif aus dem deutschen Festnetz, abweichende
Preise für Anrufe aus Mobilfunknetzen möglich
14 EU-Konformitätserklärung
Hiermit erklärt die Cherry Europe GmbH,
Auerbach/OPf., Deutschland, dass dieser
Funkanlagentyp der Richtlinie 2014/53/EU
entspricht. Den vollständigen Text der EU-Konformi-
tätserklärung finden Sie unter folgender Internet-
Adresse: www.cherry.de/compliance.
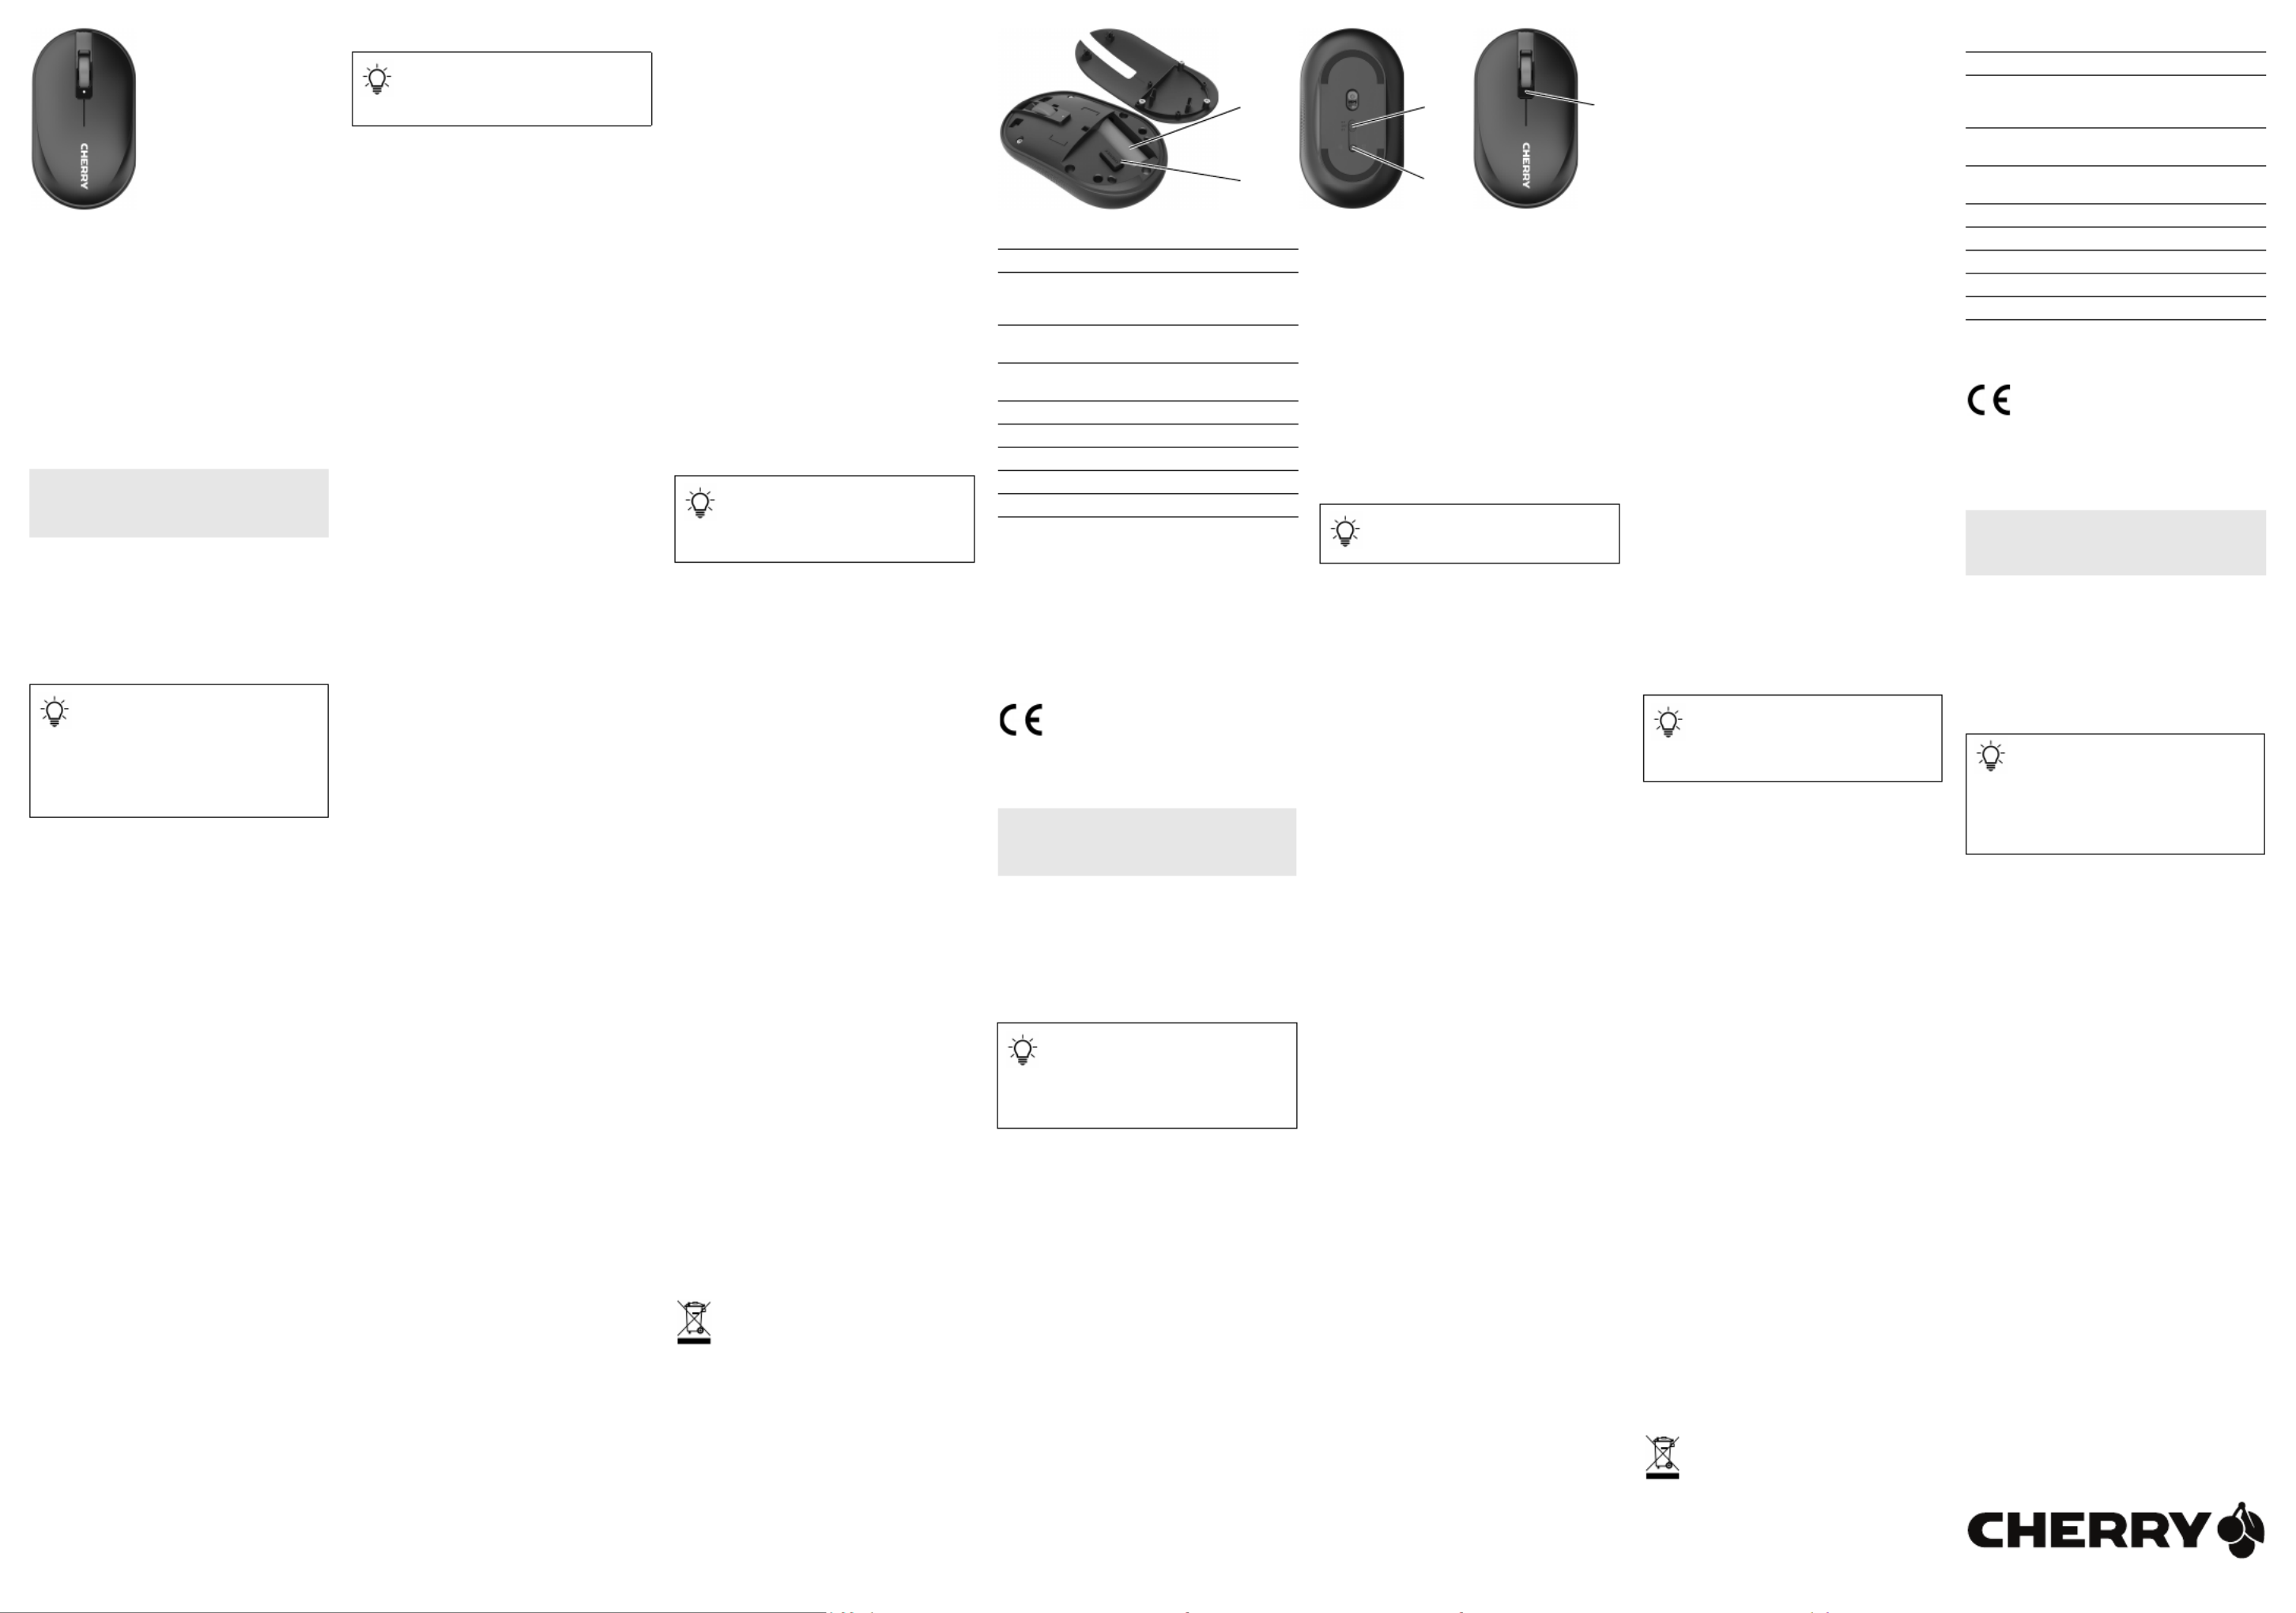
①Battery
②Receiver for wireless connection
③Off switch/wireless (RF)/Bluetooth (BT)
④Button for Bluetooth and wireless connection
⑤Status LED for battery charge status, Bluetooth
or wireless connection
Before you begin ...
The CHERRY MW 5180 is a wireless mouse for
operating PCs and laptops.
For information on other products, downloads and
much more, visit us at www.cherry.de.
1For your safety
Risk of choking from swallowing small parts
•Keep the device out of the reach of children under
3 years.
Danger of explosions due to wrong or incorrectly
inserted battery
•Only use batteries of the type named in the
technical specification.
•Insert the battery in accordance with the markings
(+/-) in the battery compartment.
RSI stands for "Repetitive Strain Injury".
RSI arises due to small movements continuously
repeated over a long period of time.
•Set up your workspace ergonomically.
•Position the keyboard and mouse in such a
manner that your upper arms and wrists are
outstretched and to the sides of your body.
•Take several short breaks, with stretching
exercises if necessary.
•Change your posture often.
Bezeichnung Wert
VersorgungsspannungMaus: 0,9 ... 1,65 V SELV
Empfänger:
5,0 V/DC ±5 % SELV
StromaufnahmeMaus: max. 20 mA
Empfänger: max. 25 mA
Batterie1 Alkali-Mangan-Batterie,
Typ LR6 (AA)
Sendefrequenz2400,0 ... 2483,5 MHz
SendeleistungMax. 10 mW (EIRP)
Bluetooth 5.1
Lagertemperatur-15 °C ... +60 °C
Betriebstemperatur0 °C ... +40 °C
EN OPERATING
MANUAL
Every device is different!
The operating instructions contain
information on effective and reliable use.
•Read the operating instructions carefully.
•Keep the operating instructions and pass them
on to other users.
2Avoiding damage
The magnet in the mouse can wipe storage media
and damage mechanical watches.
•Do not place any storage media such as magnetic
cards or external hard drives, or mechanical
watches within 10 cm of the mouse.
3Connecting the mouse to a device
You can connect the mouse to the PC/laptop or other
devices via Bluetooth or via a 2.4 GHz wireless
connection using the receiver.
Connecting via Bluetooth is convenient if you want to
use the mouse on multiple devices: You only need to
connect once and do not need the receiver. You can
also use Bluetooth to permanently connect up to
three devices to the mouse and switch between them.
3.1Connecting the mouse via Bluetooth
1Start the search for Bluetooth devices on your PC/
laptop (for example by calling up Start > Settings >
Devices > Bluetooth).
2Insert the battery into the mouse.
3Set the switch on the bottom of the mouse to "BT".
•If you wish to connect the mouse to different PCs/
notebooks: press the button on the bottom of the
mouse until the required channel is displayed (see
4 "Selecting the Bluetooth channel").
4Press and hold the button on the bottom of the
mouse for 3 seconds until the LED flashes.
From this point, you can establish a connection
within 60 seconds.
5Follow the instructions in the software.
The LED stops glowing and the mouse is connected
with your PC/laptop.
3.2Connecting the mouse via the receiver
The receiver is in a compartment under the cover of
the mouse and is held in place by a magnet.
1Insert the battery into the mouse.
2Pull the receiver out of the housing.
3Connect the receiver to a USB 2.0 port on your
PC/laptop if possible (this usually has a white or
black guide).
4Set the switch on the bottom of the mouse to "RF".
The mouse is connected with your PC/laptop.
4Selecting the Bluetooth channel
You can connect the mouse to three different devices.
There are three channels available for this.
•Press the button on the bottom of the mouse until
the required channel is displayed.
Depending on the channel, the LED will flash
1x (channel 1), 2x (channel 2) or 3x (channel 3).
5Storing the receiver in the mouse
The receiver is so small that it can stay in the USB
socket of a laptop while being transported. To avoid
any damage, you can also pull out the receiver and
deposit it in the mouse to protect it from dirt and
loss.
6Surface under the mouse
The mouse is most effective on a light-colored,
textured surface, which saves energy and ensures
optimal motion detection.
A reflective surface is not suitable for using the
mouse on.
7Switching the mouse on/off
The mouse switches to a sleep mode, which requires
nearly no energy, when it is not in use. It switches on
again automatically the first time a button is pressed.
However, it still consumes power in the energy-
saving mode, therefore you should switch it off
manually for longer periods of disuse or for
transporting.
•Push the switch on the bottom of the mouse to the
corresponding position:
Off
Wireless on = RF (the LED lights up for 5 seconds)
Bluetooth on = BT (the LED lights up for 5 seconds)
Bluetooth version
You need a PC/laptop with a Bluetooth
receiver that supports at least Bluetooth 4.0.
8Battery status
When the voltage of the mouse battery subsides, the
LED will flash 10 times.
•Replace the battery as soon as possible.
9Cleaning the mouse
1Switch the mouse off.
NOTICE: Damage due to aggressive cleaning agents
or liquid in the mouse
•Do not use solvents such as benzene, alcohol,
scouring agents or abrasive scourers for cleaning
the mouse.
•Prevent any liquid from getting inside the mouse.
2Clean the mouse with a slightly damp cloth and
some mild detergent (such as washing-up liquid).
3Dry the mouse with a soft, lint-free cloth.
10If the mouse is not working
•Switch the mouse off and on again.
•Check whether the battery is inserted correctly
and has sufficient voltage.
•Remove any objects causing interference between
the mouse and the PC/laptop. Interference is
caused in particular by metallic or electrical
objects such as cables, loudspeakers or USB
hubs.
•Reduce the distance between the mouse and the
PC/laptop.
•Should any interference be encountered when
using USB 3.0 devices right near the receiver: use
a port that is further away, an additional cable, or
a USB hub for the receiver or USB 3.0 device.
10.1Rectifying a Bluetooth connection fault
•Check if you have set the correct channel
(see 4 "Selecting the Bluetooth channel").
•Check whether the internal receiver of your PC/
laptop supports at least Bluetooth standard 4.0.
Lower versions are not supported.
•If your PC/laptop is in standby mode, it cannot be
woken up using Bluetooth devices. Switch on the
PC/laptop manually.
•Turn off any unnecessary Bluetooth devices.
•Remove the connection to the mouse in the
Bluetooth software and add it again as a new
device.
•Use an external Bluetooth receiver.
•Resetting the mouse to the factory settings: press
and hold down the mouse wheel while switching
on the mouse and keep it pressed for another
3 seconds. The settings for all 3 channels are
deleted.
•Connect the mouse using the receiver.
10.2Rectifying a connection fault using the
receiver
•Connect the receiver to a USB 2.0 port on your
PC/laptop (this usually has a white or black guide).
Malfunctions occasionally occur on USB 3.0 ports
(blue guide).
•Connect the receiver to another USB 2.0 port on
the PC/laptop.
•Reduce the distance between the receiver and the
mouse by connecting the receiver to a USB port
that is close to the mouse.
•Use a USB extension cable to place the receiver
as close to the mouse as possible.
•If the mouse has lost its connection to the
receiver, use the following steps to reconnect:
1Switch the mouse off.
2Pull the receiver out of the USB port.
3Set the switch on the bottom of the mouse to
"RF".
4Press the button on the bottom of the mouse
for 3 seconds.
The LED starts to flash.
5Within 30 seconds, plug the receiver into a USB
2.0 port on the PC/laptop and place the mouse
as close to the receiver as possible.
The LED goes out when the new connection is
established.
11Device disposal
•Do not dispose of devices with this symbol
in household waste.
•Dispose of the devices in accordance with
statutory regulations – at your local dealer
or at municipal recycling centers.
Operation of several Bluetooth devices on
a PC/laptop
When too many Bluetooth devices are
connected, it may be too much for the Bluetooth
receivers in the PC/laptop.
12Technical data
13 Certifications
13.1EU Declaration of conformity
The company Cherry Europe GmbH,
Auerbach/OPf., Germany hereby declares
that this radio system model conforms to
the European guideline 2014/53/EU. The full text of
the EU declaration of conformity can be found under
the following Internet address:
www.cherry.de/compliance.
①电池
②无线连接的接收器
③开关关闭 (off)/无线 ()/蓝牙 (RF BT)
④蓝牙与无线连接按钮
⑤电池充电状态、蓝牙或无线连接的状态
LED
在开始操作之前 ...
CHERRY MW 5180 是一款用于操作电脑/笔记本
电脑的无线鼠标。
关于其他产品的信息、下载和更多服务请访问
www.cherry-world.com。
1为了您的安全
吞咽小零件可能会引起窒息危险
•请将设备保存在 3岁以下儿童无法够及之
处。
错误放入的电池有爆炸危险
•仅可使用技术数据中指定的电池类型。
•按照电池仓中的标记 () 放入电池。+/-
“Repetitive Strain Injury”=“ ”重复性劳损
RSI 是由于频繁重复的小幅度运动造成的。
•按照人体工程学调整您的工作位置。
•将键盘和鼠标置于正确位置,确保您的上臂
和手腕在体侧自然伸展。
•多加休息,必要时进行伸展运动。
•经常变换您的身体姿势。
2避免损坏
鼠标中的磁铁可能会删除存储介质,损
坏机械表
•请勿将磁卡、外部硬盘之类的存储媒介或机
械表置于距离鼠标 10 cm 的范围以内。
Designation Value
Supply voltageMouse: 0.9 ... 1.65 V SELV
Receiver:
5.0 V/DC ±5% SELV
Current consumptionMouse: max. 20 mA
Receiver: max. 25 mA
Battery1 alkaline-manganese
battery, type LR6 (AA)
Operating frequency2400.0 ... 2483.5 MHz
Effective radiated powerMax. 10 mW (EIRP)
Bluetooth 5.1
Storage temperature-15 °C ... +60 °C
Operating temperature0 °C ... +40 °C
简体字 操作手册
设备各不相同!
在使用说明书中您可以获取有关可靠
高效操作的说明。
•请仔细阅读使用说明书。
•请保管好使用说明书,必要时将其转交给
其他用户。
① ③
② ④
⑤
64410171-00, DE, EN, ZHs, ZHt, © Jun 2022
(JW-5180-x/xx = Mod. JF-5180, JR-5180)
CHERRY MW 5180
Wireless Mouse with
Bluetooth® and
RF Transmission
Product specificaties
| Merk: | Cherry |
| Categorie: | Niet gecategoriseerd |
| Model: | MW 5180 |
Heb je hulp nodig?
Als je hulp nodig hebt met Cherry MW 5180 stel dan hieronder een vraag en andere gebruikers zullen je antwoorden
Handleiding Niet gecategoriseerd Cherry

26 November 2025
14 Juli 2025
24 November 2024
17 November 2024
17 November 2024
17 November 2024
17 November 2024
17 November 2024
17 November 2024
17 November 2024
Handleiding Niet gecategoriseerd
Nieuwste handleidingen voor Niet gecategoriseerd
8 Juni 2026
8 Juni 2026
8 Juni 2026
7 Juni 2026
7 Juni 2026
7 Juni 2026
7 Juni 2026
7 Juni 2026
6 Juni 2026
6 Juni 2026