Chapin 16200 Handleiding
Chapin Niet gecategoriseerd 16200
Bekijk gratis de handleiding van Chapin 16200 (2 pagina’s), behorend tot de categorie Niet gecategoriseerd. Deze gids werd als nuttig beoordeeld door 15 mensen en kreeg gemiddeld 4.3 sterren uit 9 reviews. Heb je een vraag over Chapin 16200 of wil je andere gebruikers van dit product iets vragen? Stel een vraag
Pagina 1/2
WARNING: Improper use or failure to follow instructions can result in explosive
failure causing serious eye or other injury. For safe use of this product you must
read and follow all instructions. Do not leave a pressurized sprayer in the hot sun.
Heat can cause pressure build-up resulting in possible explosion. Do not store or
leave solution in tank after use. Always wear goggles, gloves, long sleeve shirt, long
pants and full foot protection when spraying. Never use any tool to remove pump
if there is pressure in sprayer. Never stand with face or body over top of tank when
pumping or loosening pump to prevent ejecting pump assembly and/or solution
from striking and injuring you. Never pressurize sprayer by any means other than
the original pump. Do not attempt to modify this sprayer. Replace parts only with
manufacturer’s original parts. Never spray flammable, caustic, acidic, chlorine,
bleach or other corrosive solutions or heat, pressure, or gas producing chemicals.
Always read and follow chemical manufacturer’s instructions before use with
this sprayer as some chemicals may be hazardous when used with this sprayer.
1. Hose to Tank
1) Check tightness of hose nut to be sure hose is securely attached to the Do:
tank outlet.
2) Do: Inspect hose for deterioration, cracks, softness, or brittleness. If any of
these conditions are found, replace hose before using. Replace with original
manufacturer’s parts only.
3) Remove pump (see Filling, Pressurizing and Spraying Instructions), inspect Do:
interior and exterior of tank for signs of deterioration of body and bottom. Any
sign of deterioration indicates possible tank weakening and could result in
explosive bursting under pressure. If any of these signs are found, discard tank
immediately and replace. Do not attempt to patch leaks, etc., as this could result
in serious injury.
4) Follow Filling, Pressurizing and Spraying Instructions, except use water only Do:
(Pump plunger 10-20 strokes and inspect for leaks).
5) Do: Direct shut-off away from you and open to make sure discharge is not
clogged.
6) Do: If unit passes this test, release pressure (see Pressure Releasing
Instructions), empty tank, and proceed with Filling, Pressurizing and
Spraying Instructions.
7) Inspect all metal parts including the wand, nozzle and fittings for rust, Do:
corrosion and pitting. If any of these conditions are found, replace affected
part with original manufacturer’s part before using.
3. Pre-Use Check
4. Filling
1) Turn pump handle counterclockwise and remove pumpDo:
2) Do: Prepare spray solution following all directions and safety warnings on
chemical label.
3) Do: Fill tank to no more than the proper gallon marker. Do NOT: overfill to
accommodate pump.
4) Check pump to make sure that no grass or dirt is stuck to barrel. Do:
Replace pump in tank and tighten securely.
7. Care, Storage and Maintenance
1) Rinse tank thoroughly with water only, empty, refill with water. Follow Do:
Filling, Pressurizing and Spraying Instructions, except pump unit only 8-10
strokes. Be sure that the wand and nozzle are thoroughly rinsed with water
after each use.
2) Do: Open shut-off and allow water to run through discharge assembly.
3) Release pressure (Follow Pressure Release Instructions), remove pump Do:
and empty sprayer.
4) Store sprayer tank upside down, with pump removed, in a warm dry Do:
location.
5) Periodically oil pump by dropping 10-12 drops of light oil down pump rod Do:
through opening in cover.
• Insert the outlet tube portion of the discharge assembly into the tank adapter
(Fig. 1A).
• Firmly insert the outlet tube portion into the tank adapter (Fig. 1B) leaving no
gap between the tank adapter and outlet tube adapter. Firmly tighten the
retaining nut to the tank adapter (Fig. 1C).
1A
1C
Retaining Nut -
Securely
tightened.
Outlet
Tube
5. Pressurizing and Spraying
Do: Turn handle clock-
wise to tighten. Push
handle down, turn 1/4
turn counterclockwise
to release.
Do: Pump
until you feel
resistance.
Do: Push handle, down,
turn 1/4 turn clockwise
to lock. Begin spraying.
Re-pump sprayer as
required to maintain
spray force.
Do: Turn end of nozzle to
adjust spray pattern.
5A
5A
5A
5A5A
5C
5C
5C
5C5C
5B
5B
5B
5B5B
5D
5D
5D
5D5D
1B
1B
1B
1B1B
No Gap
Sk-1154-1
6. To Release Pressure
Sprayers with no pressure release valve
Do: With pump facing away, turn locked handle counterclockwise until air
begins to escape. Stop turning handle when you hear air escaping. Point Do:
pump away until all air has escaped.
8. Fatigue-Free Spraying
To release, press down and slide handle back.
8D8C
For constant spraying, push down on shut-off handle and slide forward.
8A8B
To Lock
To Un-Lock
Adapter
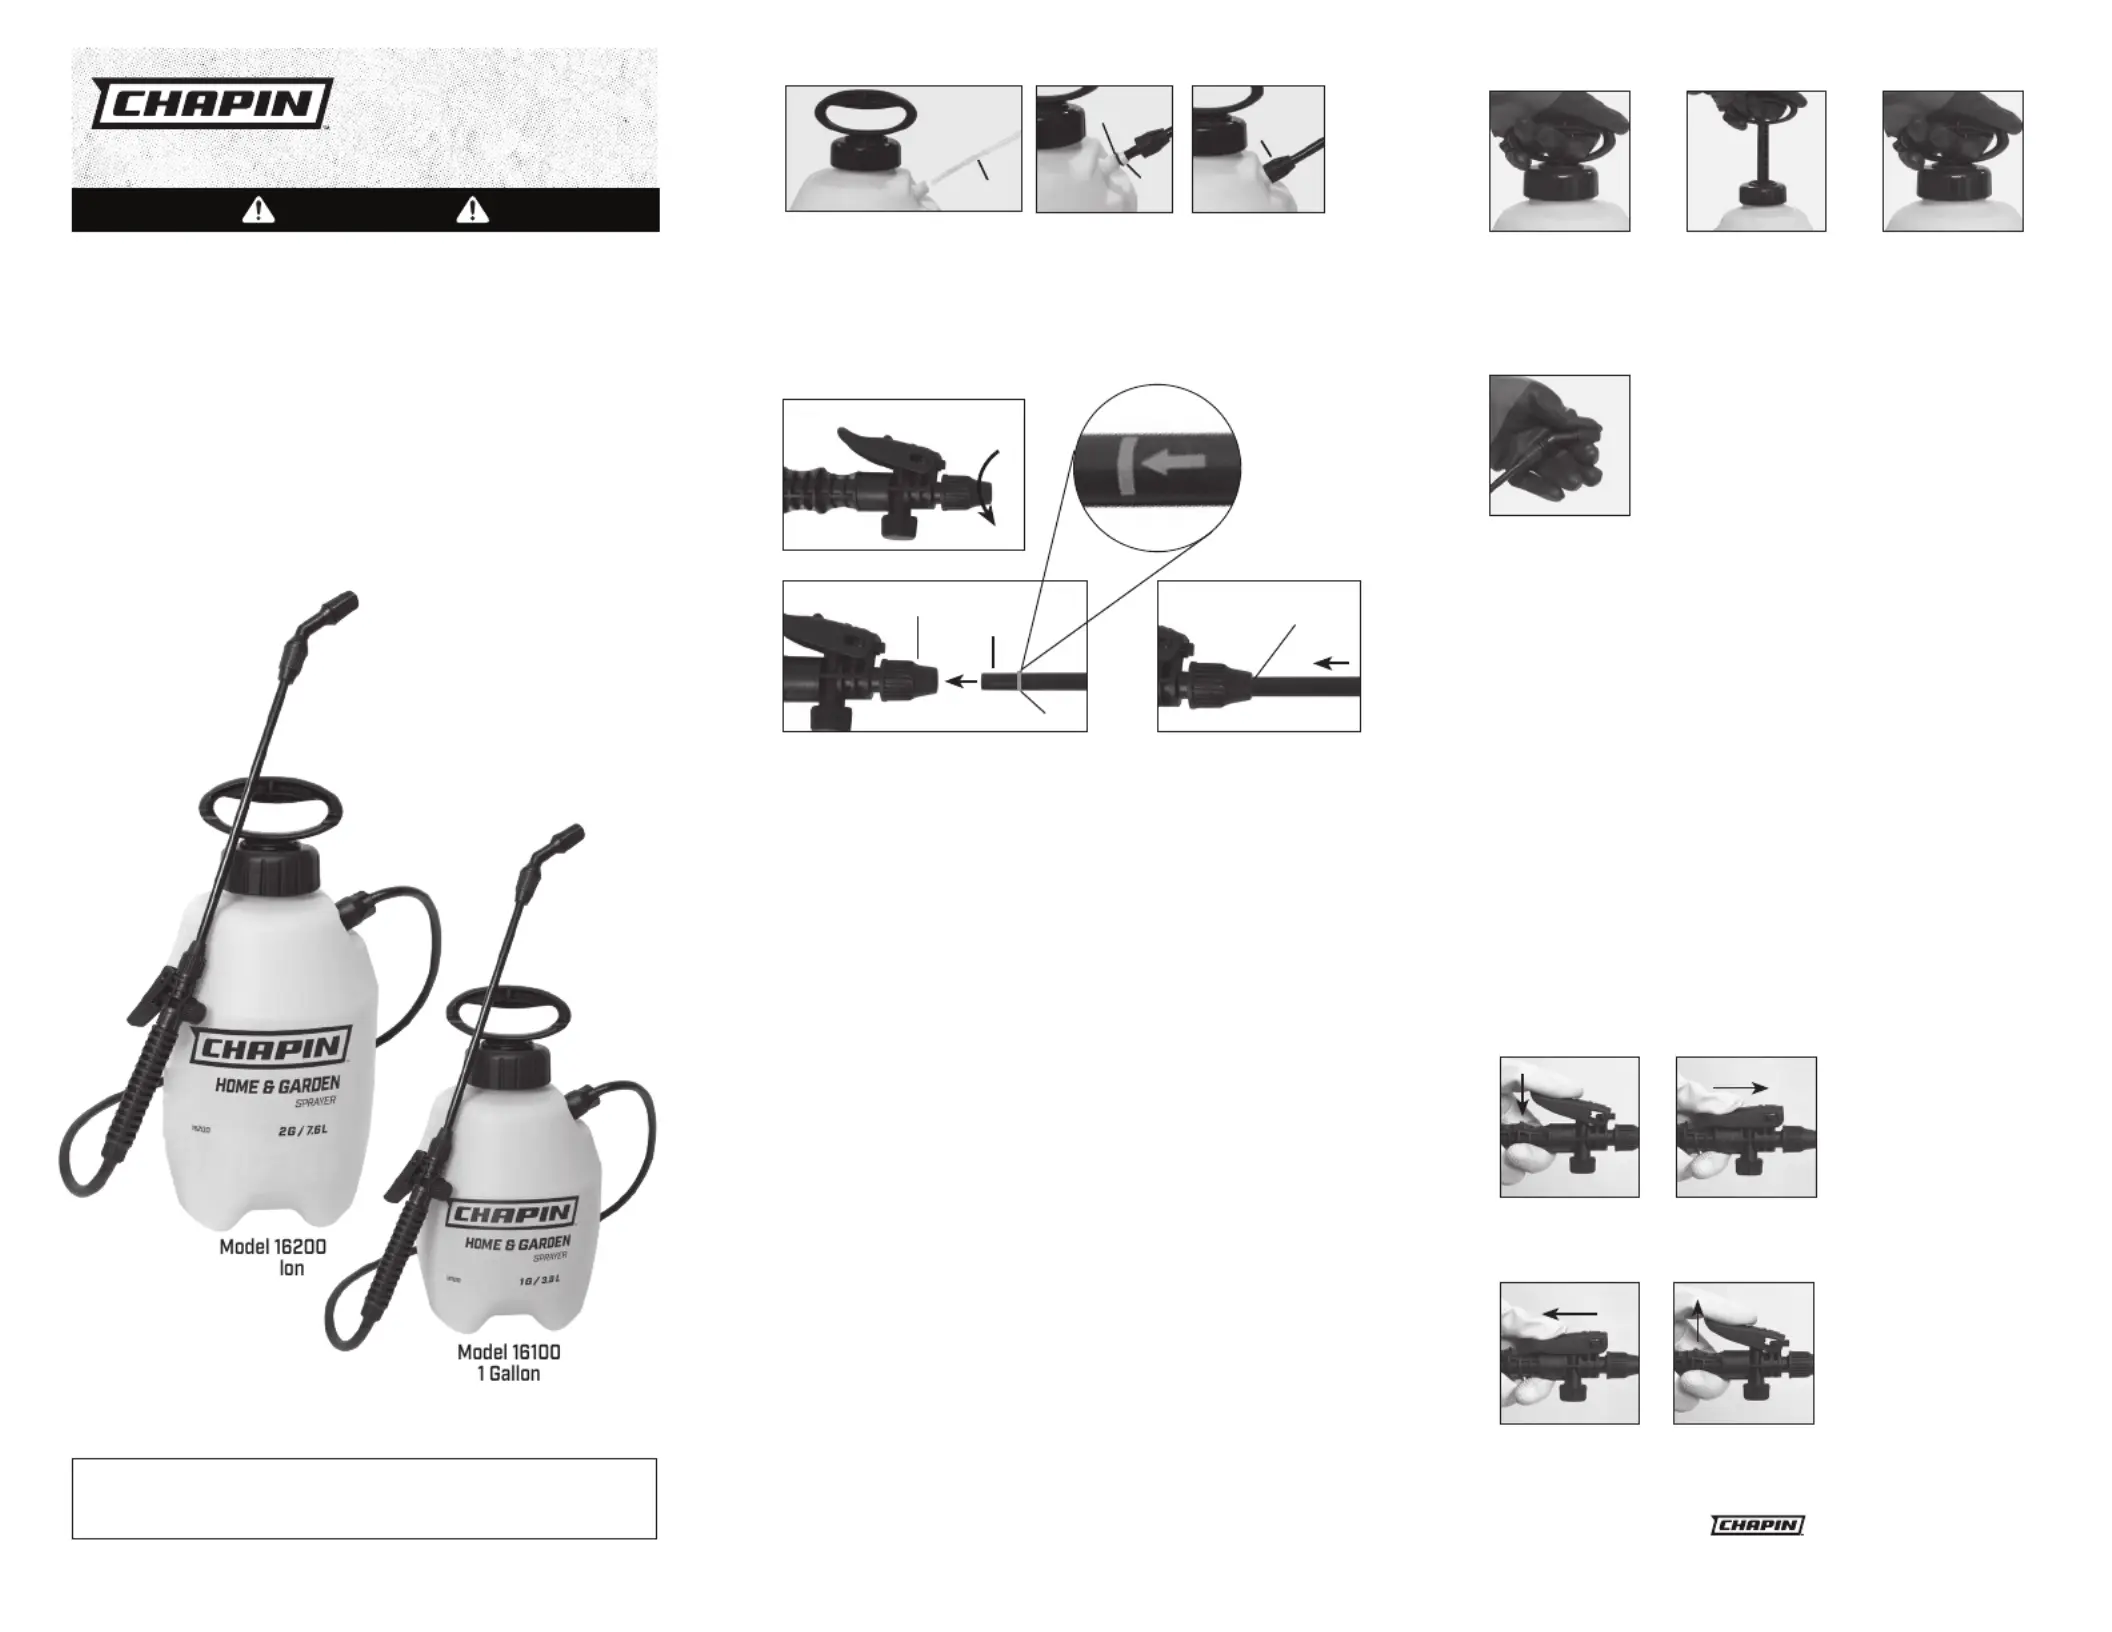
2. Extension Wand to Shut-off
Loosen retaining nut from shut-off (2A). Insert extension wand into end
of shut-off until you no longer see the line marked on the end of the
wand. Tighten retaining nut (2C).
2B
Retaining Nut
Extension
Wand
2A
2C
Line
Line is no
longer visible
WARNING
016106R1022
Congratulations!
You have just purchased a quality Chapin product.
Register Your Sprayer Online @ www.chapinmfg.com Questions? Do Not Return To Store.
Call us @ 1-800-950-4458 or www.chapinmfg.com
P.O. Box 549 700 Ellicott St.
Batavia, NY 14021-0549 U.S.A.
1-800-950-4458 www.chapinmfg.com
1 Gal
Product specificaties
| Merk: | Chapin |
| Categorie: | Niet gecategoriseerd |
| Model: | 16200 |
Heb je hulp nodig?
Als je hulp nodig hebt met Chapin 16200 stel dan hieronder een vraag en andere gebruikers zullen je antwoorden
Handleiding Niet gecategoriseerd Chapin

13 Juli 2026
8 Juli 2026
8 Maart 2026
7 Maart 2026
7 Maart 2026
6 Maart 2026
6 Maart 2026
6 Maart 2026
3 Maart 2026
3 Maart 2026
Handleiding Niet gecategoriseerd
Nieuwste handleidingen voor Niet gecategoriseerd
23 Juli 2026
23 Juli 2026
23 Juli 2026
23 Juli 2026
23 Juli 2026
23 Juli 2026
22 Juli 2026
22 Juli 2026
22 Juli 2026
22 Juli 2026