Bosch PKD731FP8E Handleiding
Bekijk gratis de handleiding van Bosch PKD731FP8E (16 pagina’s), behorend tot de categorie Fornuis. Deze gids werd als nuttig beoordeeld door 121 mensen en kreeg gemiddeld 4.3 sterren uit 6 reviews. Heb je een vraag over Bosch PKD731FP8E of wil je andere gebruikers van dit product iets vragen? Stel een vraag
Pagina 1/16
1
*9000750994*
9000750994 020726
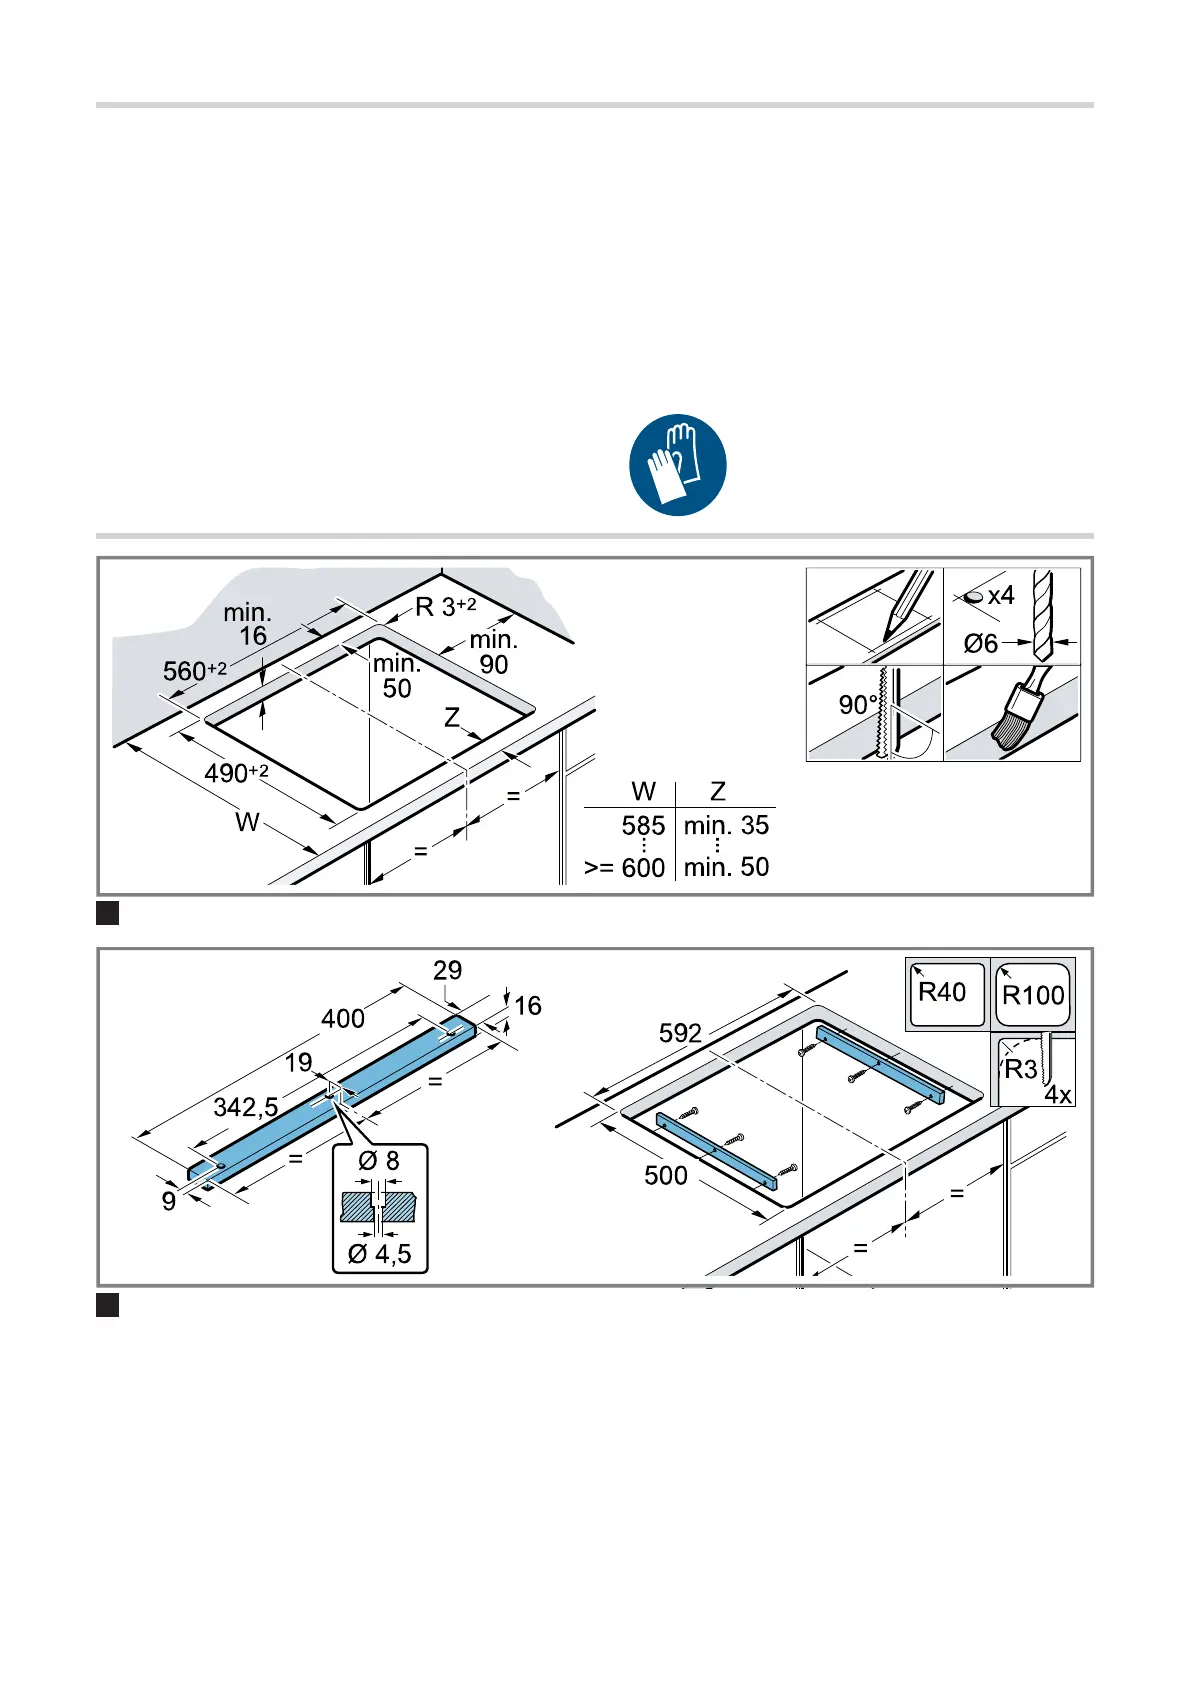
deMontageanleitung
enInstallation instructions
frNotice d'installation
itIstruzioni d'installazione
noInstallasjonsveiledning
daInstallationsvejledning
nlInstallatie-instructies
pl
Instrukcje montażu
ptInstruções de instalação
esInstrucciones de montaje
el
Οδηγίες εγκατάστασης
svInstallationsanvisningar
fiAsennusohjeet
ru
Инструкция по установке
csPokyny kinstalaci
trKurulum talimatları
1
2
Product specificaties
| Merk: | Bosch |
| Categorie: | Fornuis |
| Model: | PKD731FP8E |
| Apparaatplaatsing: | Ingebouwd |
| Soort bediening: | Touch |
| Kleur van het product: | Zwart |
| Aantal vermogenniveau's: | 17 |
| Ingebouwd display: | Ja |
| Timer: | Ja |
| Gewicht: | 8600 g |
| Breedte: | 710 mm |
| Diepte: | 522 mm |
| Hoogte: | 39 mm |
| Snoerlengte: | 1 m |
| Kinderslot: | Ja |
| Gewicht verpakking: | 10300 g |
| Breedte verpakking: | 1020 mm |
| Diepte verpakking: | 600 mm |
| Hoogte verpakking: | 100 mm |
| Soort materiaal (bovenkant): | Glaskeramiek |
| Vermogen brander/kookzone 2: | 1200 W |
| Vermogen brander/kookzone 3: | 1200 W |
| Vermogen brander/kookzone 1: | 3400 W |
| Aantal branders/kookzones: | 3 zone(s) |
| Type kookplaat: | Keramisch |
| Aantal gaspitten: | - zone(s) |
| Aantal elektronische kook zones: | 3 zone(s) |
| Controle positie: | Boven voorzijde |
| Aangesloten lading (elektrisch): | 5750 W |
| Installatie compartiment breedte: | 560 mm |
| Installatie compartiment hoogte: | 39 mm |
| Aangesloten lading (gas): | - W |
| Breedte kookplaat: | 71 cm |
| Installatie compartiment diepte (min): | 490 mm |
| Restwarmte-indicator: | Ja |
| Frame type: | Frameloos |
| Voedingsbron brander/kookzone 1: | Electrisch |
| Voedingsbron brander/kookzone 2: | Electrisch |
| Voedingsbron brander/kookzone 3: | Electrisch |
| Kookzone 1 boost: | 4000 W |
| Installatie compartiment diepte (max): | 500 mm |
| Positie brander/kookzone 1: | Rechts |
| Diameter brander/kookzone 1: | 320 mm |
| Positie brander/kookzone 2: | Links achter |
| Diameter brander/kookzone 2: | 145 mm |
| Positie brander/kookzone 3: | Links voor |
| Diameter brander/kookzone 3: | 145 mm |
| Kookzone 1 vorm: | Rond |
| Kookzone 2 vorm: | Rond |
| Kookzone 3 vorm: | Rond |
| AC-ingangsspanning: | 220 - 240 V |
| AC-ingangsfrequentie: | 50 - 60 Hz |
| Inbouw afzuigkap: | Nee |
Heb je hulp nodig?
Als je hulp nodig hebt met Bosch PKD731FP8E stel dan hieronder een vraag en andere gebruikers zullen je antwoorden
Handleiding Fornuis Bosch

16 Juni 2026
16 Juni 2026
16 Juni 2026
16 Juni 2026
16 Juni 2026
2 Juni 2026
28 Mei 2026
27 Mei 2026
26 Mei 2026
25 Mei 2026
Handleiding Fornuis
Nieuwste handleidingen voor Fornuis
15 Juni 2026
15 Juni 2026
15 Juni 2026
15 Juni 2026
15 Juni 2026
15 Juni 2026
15 Juni 2026
15 Juni 2026
15 Juni 2026
15 Juni 2026