AMX VARIA-ACS-100F Handleiding
AMX Niet gecategoriseerd VARIA-ACS-100F
Bekijk gratis de handleiding van AMX VARIA-ACS-100F (2 pagina’s), behorend tot de categorie Niet gecategoriseerd. Deze gids werd als nuttig beoordeeld door 417 mensen en kreeg gemiddeld 4.1 sterren uit 8 reviews. Heb je een vraag over AMX VARIA-ACS-100F of wil je andere gebruikers van dit product iets vragen? Stel een vraag
Pagina 1/2
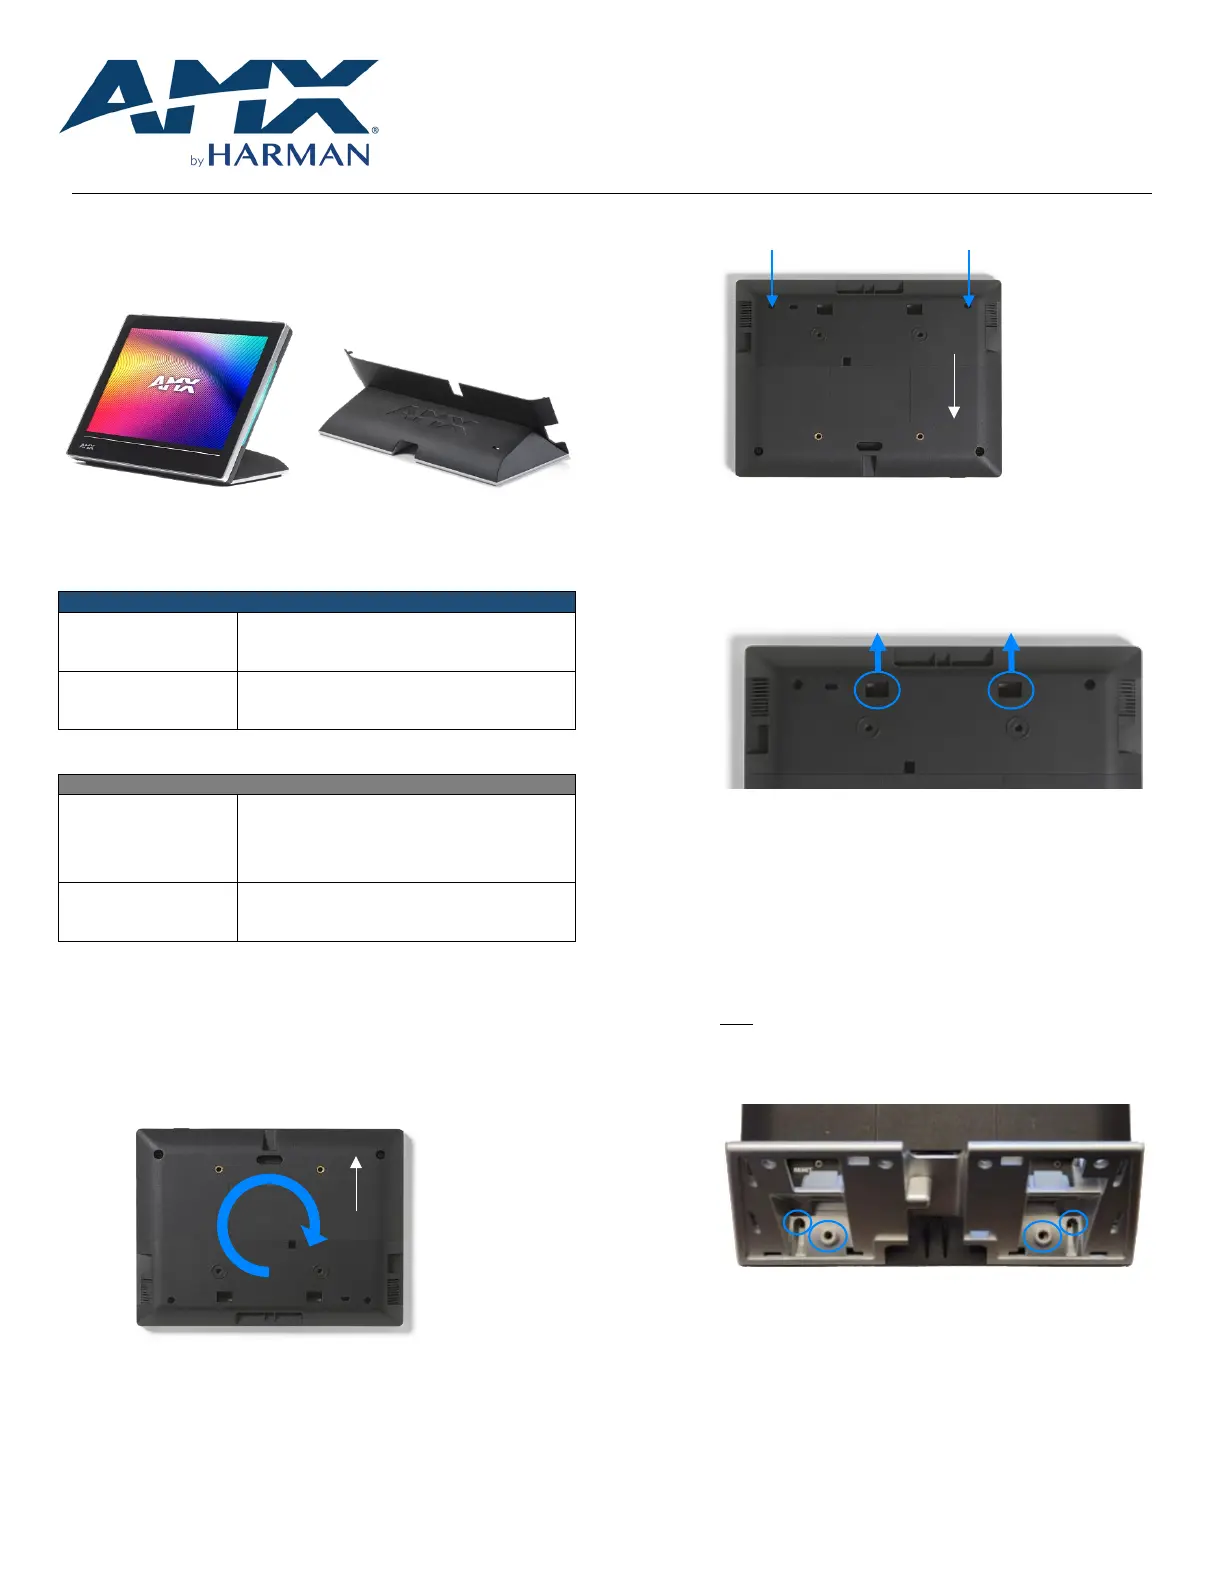
QUICK START GUIDE
VARIA-ACS-80F 8” Fixed Tabletop Stand
VARIA-ACS-100F
10.1” Fixed Tabletop Stand
Overview
TheVariaFixed Tabletop stands are designed for 8” VARIA-80 & 10.1” VARIA-100
Touch Panels, and give them a sturdy & stylish fixed-angle tabletop solution
that’s reminiscent of AMX’s Modero touch panel family.
FIG. 1VariaTouch Panel on Fixed Tabletop Stand
Model Availability & Compatibility
FIXED TABLETOP STANDS
VARIA-ACS-80F
(AMX-UMT0801)
VARIA-80 Touch Panel (AMX-UTP0811)
VARIA-ACS-100F
(AMX-UMT1001)
VARIA-100 Touch Panel (AMX-UTP1011)
VARIA-100N Touch Panel (AMX-UTP1011N)
Other Models Available
ANGLE-SELECT TABLETOP STANDS
VARIA-ACS-810A
(AMX-UMT8111)
VARIA-80 Touch Panel (AMX-UTP0811)
VARIA-100 Touch Panel (AMX-UTP1011)
VARIA-100N Touch Panel (AMX-UTP1011N)
VARIA-ACS-150A
(AMX-UMT1511)
VARIA-150 Touch Panel (AMX-UTP1511)
VARIA-150N Touch Panel (AMX-UTP1511N)
Installation
VariaFixed Tabletop Stands are easily installed with the supplied hardware and
a Philips-head screwdriver.
1.Place the panel face-down on a soft cloth, and orient the panel so
that the top of the touch panel is closest to you.
FIG. 2Varia Touch Panel, rear
2.If they are installed, remove two screws from the lower back cover.
Screw Locations
FIG. 3Rear cover screws, if installed
3.Place your thumbs onthe rectangular access holes, and push the
lower cover away from you.The lower cover can thenbe placed
aside; it is not used with the Fixed Tabletop Stands.
FIG. 4 Rear cover removal
4.Rotatethe panel back around so the bottom is closest to you.
5.On the tabletop stand, remove the black plastic cover by sliding it
away from the aluminum base. It is held on by magnets. Then
unscrew the rubber pads from the base.
6.Install the aluminum base on the back o the touch panel.
Note:In mostcircumstances, the networking cable can be routed in
after base installation. However, category cables with bulky strain
relief and/or hoods over the RJ-45 connector may need to be installed
before the aluminum base.
FIG.5Fixed Tabletop Stand, aluminum base, underneath
7.Attach the base with the four (4) supplied screws.
Top
Top
Product specificaties
| Merk: | AMX |
| Categorie: | Niet gecategoriseerd |
| Model: | VARIA-ACS-100F |
Heb je hulp nodig?
Als je hulp nodig hebt met AMX VARIA-ACS-100F stel dan hieronder een vraag en andere gebruikers zullen je antwoorden
Handleiding Niet gecategoriseerd AMX

10 Mei 2026
7 Mei 2026
5 Mei 2026
4 Mei 2026
24 November 2025
5 Augustus 2025
5 Augustus 2025
4 Augustus 2025
4 Augustus 2025
4 Augustus 2025
Handleiding Niet gecategoriseerd
Nieuwste handleidingen voor Niet gecategoriseerd
8 Juni 2026
8 Juni 2026
8 Juni 2026
8 Juni 2026
8 Juni 2026
8 Juni 2026
8 Juni 2026
8 Juni 2026
8 Juni 2026
8 Juni 2026