AMX NMX-ENC-N1122A Handleiding
AMX Niet gecategoriseerd NMX-ENC-N1122A
Bekijk gratis de handleiding van AMX NMX-ENC-N1122A (2 pagina’s), behorend tot de categorie Niet gecategoriseerd. Deze gids werd als nuttig beoordeeld door 164 mensen en kreeg gemiddeld 4.6 sterren uit 5 reviews. Heb je een vraag over AMX NMX-ENC-N1122A of wil je andere gebruikers van dit product iets vragen? Stel een vraag
Pagina 1/2
QUICK START GUIDE
SVSI N1122A/N1222A/N1133A/N1233A MPC Series
Overview
All Encoders and Decoders of the SVSI N1122A/N1222A/N1133A/N1233A MPC
(Minimum Proprietary Compression) products feature input and output scaling, serial,
balanced audio, HDMI video connection, and Power-over-Ethernet (PoE). Some models
also offer 1G SFP support for uncompressed networked AV video and USB control
inputs for KVM keyboard and mouse over IP.
Depending on the model, the P1 port on the rear of the unit is either an SFP (N1133A/
N1233A) or an RJ45 (N1122A/N1222A) network connection. FIG. 1 shows the fully-
equipped model, complete with SFP and USB support. These devices are all AES67
compatible, which enables high-performance audio-over-IP streaming interoperability.
Basic Installation Guidelines
Establishing Connection
N1000 MPC devices are shipped with DHCP as their default IP mode. The IP address is
assigned automatically based on the network DHCP server. If no DHCP server is found,
the unit will use Auto IP mode instead (with a default IP address of 169.254.xxx.xxx).
Before using your N1000 MPC unit, it must be configured using the free N-Able device
management software. However, you will not be able to configure units until they are in
the same subnet as the host computer.
The sample steps below show how the required changes (to the host computer’s IP
settings) are made in a Windows environment.
Steps for IP address configuration:
1.From the Control Panel > Network and Internet dialog box, select Network and
Sharing Center.
2.Select Change adapter settings.
3.Select the wired interface connected to your AV network.
4.Click the Properties button.
5.Scroll down in the list to the Internet Protocol Version 4 (TCP/IPv4) option.
Highlight it and click the Properties button.
6.Enable the Use the following IP address option, and enter the static IP address
provided to you by your network administrator.
NOTE: If the computer does not need Internet access, you can simply enter a unique
169.254.xxx.xxx IP address with a 255.255.0.0 Subnet mask. Please contact your
network administrator if you are unsure of how to configure the existing interface. If the
computer has a statically-assigned IP address, click on the Advanced button. Then click
Add to enter a unique 169.254.xxx.xxx address with a subnet of 255.255.0.0.
Steps for auto discovering devices on the network:
1.Use the host computer to download and install the latest version of N-Able:
PC version -
http://www.amx.com/products/N-ABLE-PC.asp
Mac version -
http://www.amx.com/products/N-ABLE-MAC.asp
2.Attach your N1000 MPC unit(s) to the layer-3 network switch.
3.Disable the wireless adapter on your computer (it must be hard-wired to the
switch).
4.Connect the host computer to the layer-3 network switch.
5.Open the N-Able application.
If all devices do not appear automatically, click the Auto Discover button on the
UnitManagement tab. This issues a broadcast command that will discover all units
even if they are not in the same IP subnet.
Logging in Using N-Able Software
Once the host IP address is configured properly, you can view all discovered units using
the N-Able software. Access the N1000 MPC units from the following tabs:
•Unit Management tab - N1000 Encoder/Decoder is listed in the Type field.
•Video Matrix tab - N1000 MPC units are found on the N1000 sub-tab of this
screen.
Double-click the unit’s name (in one of the lists mentioned above) to view its Settings
page. If prompted, enter admin and password for the default username and password.
Once logged in, you can change the username and password (using the options on the
unit’s Settings page). From this page, you can access any of the main pages of the
unit’s GUI.
NOTE: If you would like for N-Able to support auto-login to your units, make sure N-Able’s
Device Auto-login settings match the unit’s username and password (by selecting N-Able
> Settings from the N-Able tool bar).
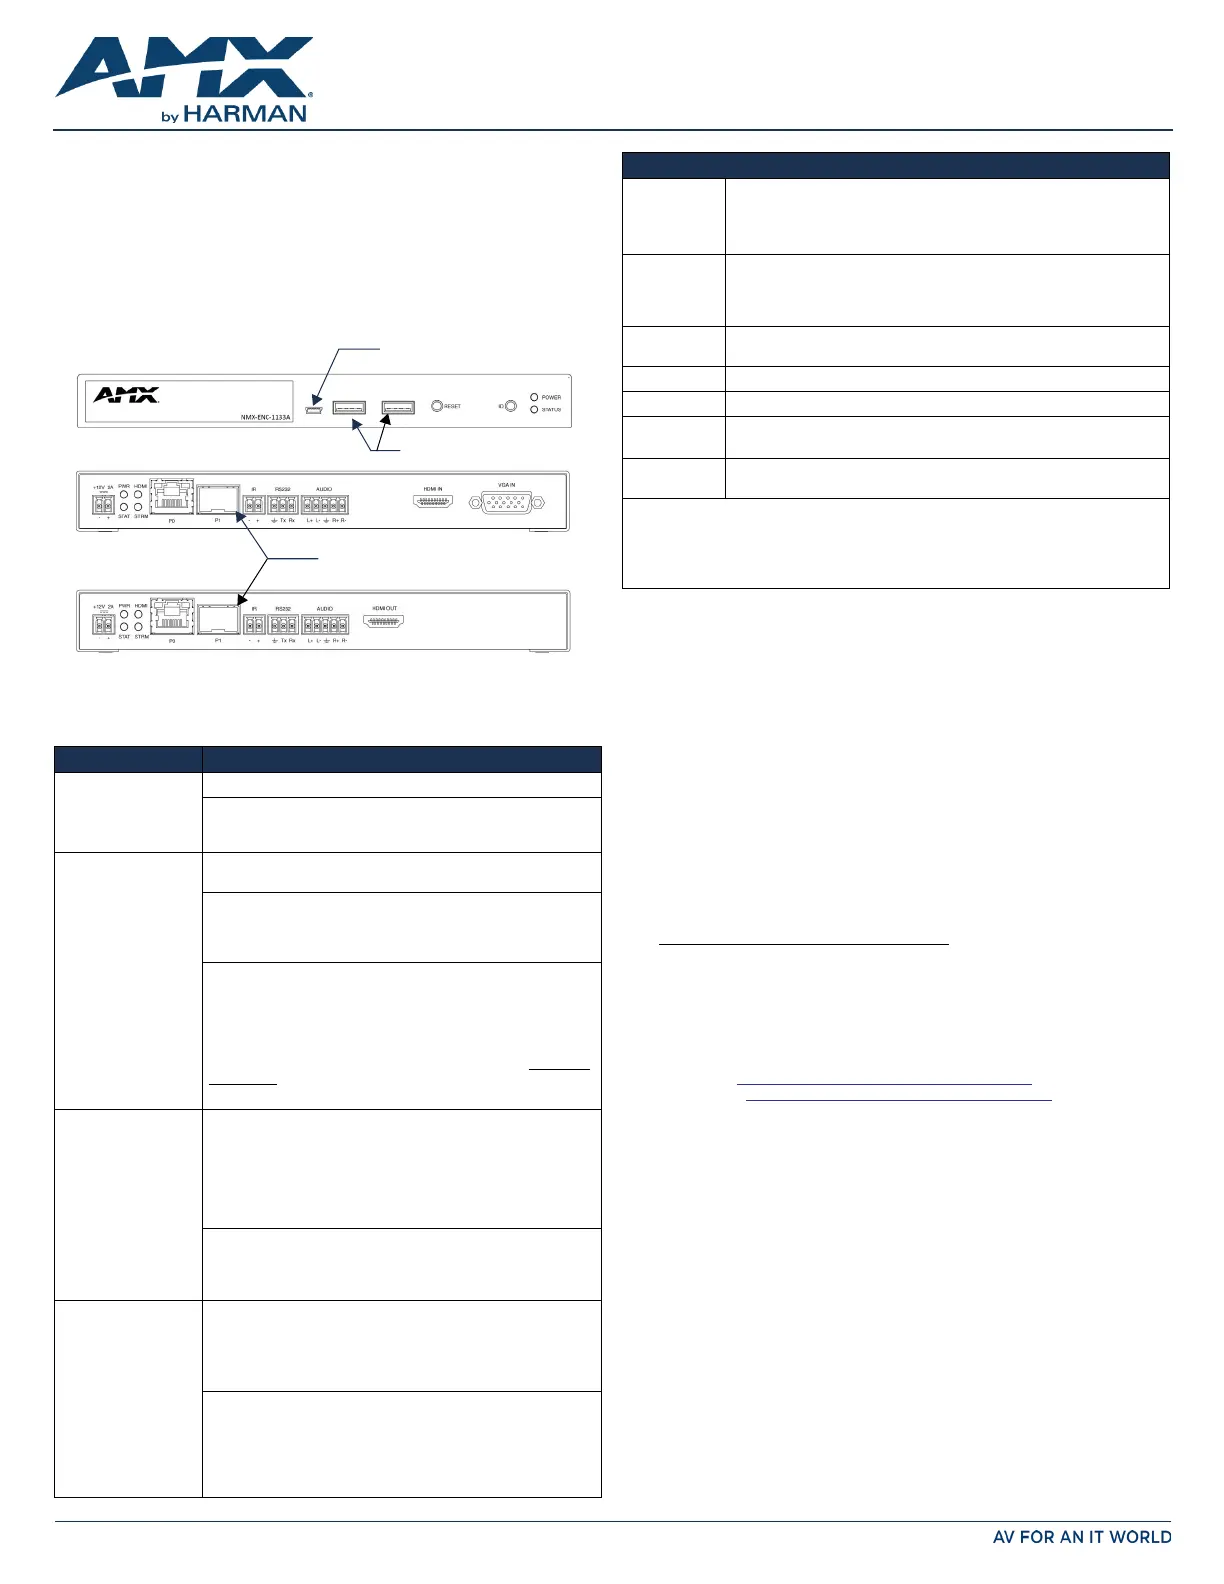
FIG. 1
N1133A/N1233A USB AND SFP PORTS
NOTE: The SFP port supports 1000BASE-X or 1000BASE-T connections only.
ConnectionsOptions
Power:
PoE: Connect the unit’s P0 port to an active, PoE-enabled network switch
External power supply: If not using PoE for power, connect a 12V
regulated power supply (part number N9312) to the unit’s two-pin
terminal block plug connector labeled +12V 2A.
Network:PoE: If using PoE to power the unit, you should already have a
network connection.
External power: If not using PoE, connect the P0 port to the
network using an Ethernet cable, or connect the P1 port to the
network with the appropriate cable (fiber transceiver or direct-
attach cable is required for SFP connections).
Daisy-chain configuration: Once network connection is
established to one unit, you can daisy-chain additional units by
connecting Ethernet cables between devices using their P0 and/or
P1 ports. Keep in mind that the number of units supported in this
configuration is limited by bandwidth (total aggregate streams
must be less than 1 Gb/s).
NOTE: PoE power is only supplied to the unit connected
directly to
the network. All other units in the daisy-chain must have an
external power supply.
Video:N1122A/N1133A MPC Encoders
•For video encoding of a digital source, connect the source to the
Encoder’s HDMI IN port using a video cable with an HDMI
connector (or adapter).
•For video encoding of an analog source, connect the source to
the Encoder’s VGA IN port using a video cable with a VGA
connector (or component adapter).
N1222A/N1233A MPC Decoders
•For video decoding, connect a digital display to the Decoder’s
HDMI OUT port using a video cable with an HDMI connector (or
adapter).
Audio:N1122A/N1133A MPC Encoders
•For audio encoding, connect a line level analog audio source to
the Audio input terminal block plug connector, or
•Use the embedded audio from the video source, or
•Enable AES67 Audio to transmit an AES67 audio stream.
N1222A/N1233A MPC Decoders
•For analog audio decoding, connect a line level analog audio
device to the Audio output terminal block plug connector, or
•Send embedded digital audio (embedded in the HDMI
connection) to a monitor’s speakers, or
•Enable AES67 Audio to receive an AES67 audio stream.
One USB Mini-B Port
Two USB Standard-A Ports
1G SFP ports accepts compatible
(supported by N1133A Encoders)
fiber transceivers or direct attach
cables (fiber or copper cabling)
(supported by N1233A Decoders)
N1133A/N1233A Front View
N1133A Encoder Rear View
N1233A Decoder Rear View
Product Specifications
Models
Available:
NMX-ENC-N1122A Encoders - two RJ45 network ports
NMX-ENC-N1133A Encoders - 1G SFP port, RJ45 port; three USB ports
NMX-DEC-N1222A Decoders - two RJ45 network ports
NMX-DEC-N1233A Decoders - 1G SFP port and RJ45 port; three USB ports
Power
Requirements:
PoE: Can be powered via a PoE switch or other equipment with a PoE
source. Conforms to IEEE 802.3af Class 3 (802.3at Type 1).
External power supply: 2.0 Amp @ 12 Volts DC; 100-240 Volts AC power
supply; Part number N9312 (sold separately).
Dimensions
(HWD):
1.05” x 7.888” x 5.5” (2.67cm x 20.04cm x 14cm)
Weight:1.55 lbs (0.7kg)
Certifications:FCC, CE, and NRTL
Environmental:Temperature: 32° to 104°F (0° to 40°C)
Humidity: 10% to 90% RH (non-condensing)
Mounting
Options:
Stand alone, surface mount, wall mount, or rack mount.*
NOTE: *Mounting wings (part number N9101) required for surface and wall mounting.
Rack shelf (part number N9102) or card cage (part number N9206) required for rack
mounting. Shelf accommodates two side-by-side N-Series Encoders and Decoders.
Card cage accommodates up to six N-Series Encoder and Decoder cards (mix and
match any series).
Product specificaties
| Merk: | AMX |
| Categorie: | Niet gecategoriseerd |
| Model: | NMX-ENC-N1122A |
Heb je hulp nodig?
Als je hulp nodig hebt met AMX NMX-ENC-N1122A stel dan hieronder een vraag en andere gebruikers zullen je antwoorden
Handleiding Niet gecategoriseerd AMX

10 Mei 2026
7 Mei 2026
5 Mei 2026
4 Mei 2026
24 November 2025
5 Augustus 2025
5 Augustus 2025
4 Augustus 2025
4 Augustus 2025
4 Augustus 2025
Handleiding Niet gecategoriseerd
Nieuwste handleidingen voor Niet gecategoriseerd
8 Juni 2026
8 Juni 2026
8 Juni 2026
8 Juni 2026
8 Juni 2026
8 Juni 2026
8 Juni 2026
8 Juni 2026
8 Juni 2026
8 Juni 2026